|
<< Click to Display Table of Contents >> Assigning Trucks and Excavators to Subsequences |
  
|
|
<< Click to Display Table of Contents >> Assigning Trucks and Excavators to Subsequences |
  
|
Trucks and Excavators are assigned to Subsequences using the Trucks and Excavators page of the Simulation Settings dialog:
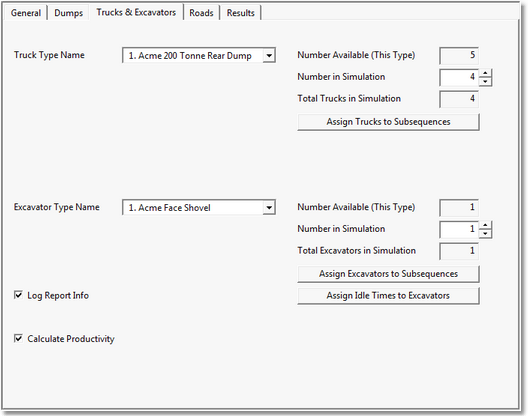
Simulation Settings dialog, Trucks and Excavators page
The procedure for assigning Trucks and Excavators is as follows:
Add Trucks for inclusion in Simulation
Using the Truck Type Name pulldown list select a Truck Type for inclusion in the simulation. Once a particular Truck Type is selected the number of these trucks available will appear in the Number Available field at the top right of the dialog. This is the number nominated when the Truck Type was created (see Setting up Trucks topic). Any number up to the Number Available can be included in the simulation. Note that because a particular number of trucks are selected for inclusion in simulation does not mean that all these trucks will be utilised. Only those trucks assigned to Subsequences will be used by the simulation. Typically all available trucks of a particular type will be allocated the simulation whether they are intended to be used or not.
This procedure is repeated for all Truck Types intended for inclusion in the simulation. Once the first Truck Type is processed, use the Truck Type Name pulldown list to select the next Truck Type and assign a number for inclusion in the Simulation. As Trucks are added the total number of trucks in the simulation appears in the Total Trucks in Simulation field.
Add Excavators for inclusion in Simulation
Using the Excavator Type Name pulldown list select an Excavator Type for inclusion in the simulation. Once a particular Excavator Type is selected the number of these Excavators available will appear in the Number Available field at the top right of the dialog. This is the number nominated when the Excavator Type was created (see Setting up Excavators topic). Any number up to the Number Available can be included in the simulation. Note that because a particular number of Excavators are selected for inclusion in simulation does not mean that all these Excavators will be utilised. Only those Excavators assigned to Subsequences will be used by the simulation. Typically all available Excavators of a particular type will be allocated the Simulation whether they are intended to be used or not.
This procedure is repeated for all Excavator Types intended for inclusion in the Simulation. Once the first Excavator Type is processed, use the Excavator Type Name pulldown list to select the next Excavator Type and assign a number for inclusion in the Simulation. As Excavators are added the total number of Excavators in the simulation appears in the Total Excavators in Simulation field.
Assign Trucks to Subsequences
Trucks can be assigned to Subsequences manually or using the Optimisation options. The user must manually assign a fixed number of trucks whether using optimisation or manually assigning.
Once the required trucks are added to the Simulation they must be assigned to Subsequences. This is achieved by clicking on the Assign Trucks to Subsequences button. Clicking this button opens up the Assign Trucks to Subsequences dialog.
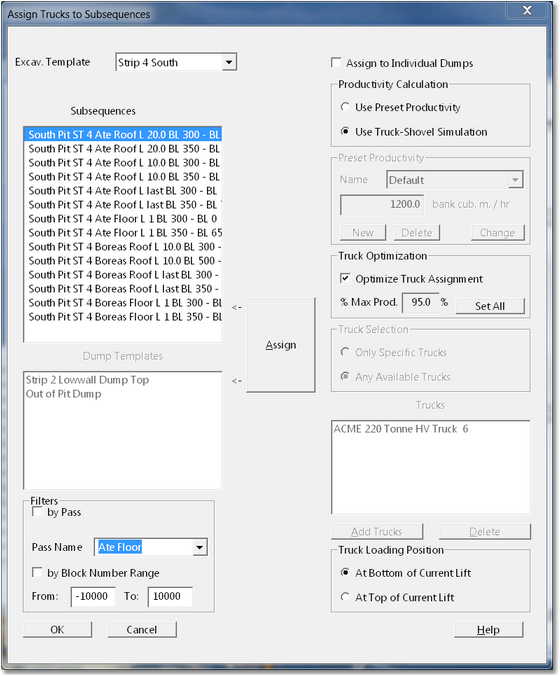
Assign Trucks to Subsequences dialog
The Assign Trucks to Subsequences dialog has the following components:
Excavation Template pulldown list (top left of dialog) and Subsequences list (left column of dialog).
Efficient and accurate assignment of Trucks to Subsequences requires the use of a methodical approach. To assist in this the process of assignment is filtered by Excavation Template. The Excavation Template pulldown list provides a list of all Excavation Templates used to create the Supersequence (i.e. the Excavation Templates used to create the Subsequences that form the Supersequence). Once a particular Excavation Template is selected the Subsequences associated with that Template appear in the Subsequences list. Typically an excavation template is used to create a staged excavation for a particular Strip of a particular Pit. So this method effectively filters sub sequences by Strip and Pit.
Once Subsequences appear in the Subsequences list they may be selected and have Trucks assigned. Subsequences can be selected individually for truck assignment, or multiple Subsequences with common truck assignment can be grouped selected.
Filters (lower left of dialog). The methodical assignment of trucks to Subsequences is further enhanced by the use of the Filters group. This allows Subsequences appearing in the Subsequences list to be filtered by Pass and or Block range. Once a particular filter is established only Subsequences meeting the filter criteria will appear in the Subsequences list.
A complex multi-pass pit may contain many Subsequences requiring Truck assignment. Frequently all waste Subsequences for a particular pass will be taken with common truck fleet. In such cases using the pass filter will isolate a group of Subsequences with common Truck assignment. These Subsequences can then be group selected and Trucks assigned in one step.
A long pit may have different fleets operating in different ends of the pit. In such cases the Block filter in conjunction with the Pass filter can isolate Subsequences with common truck assignment. Note that when using the Block filter is not necessary to precisely specify a block range which exactly matches the Block range of Subsequence. This is important as Subsequence block range may vary somewhat from lift to lift. In order for a Subsequence to pass the Filter, the Block range for the Subsequence must lie within the Filter range. So for example if a particular Filter range is from Block 600 to Block 1200, and a Subsequence has a Block range of 500 to 1000, the Subsequence will pass the filter and appear in the Subsequences list. Those Subsequences whose Block range is not fully within the Filter range will be excluded. It is generally best to set a Block Filter range slightly larger than the expected range of the target Subsequences to ensure that no Subsequences are missed.
Assign to Individual Dumps checkbox and Dump Template list. The truck for a Subsequence assignment can be varied depending on which dump material is reporting to. When the Assign to Individual Dumps checkbox is selected the Dump Template list becomes enabled. By selecting individual Dumps from the Dump Templates list the number of trucks assigned can be varied with each Dump.
Preset Productivity group. As well as assigning an equipment fleet to a Subsequence a fixed productivity called a Preset Productivity can be assigned. Even when the bulk of the simulation is conducted with Truck and Shovel Simulation it is often appropriate that some Subsequences be simulated with Preset Productivity. An example is a Subsequence which excavates coal and halls to a stockpile. The use of Preset Productivity is explained in the topic Using Preset Productivities.
Truck Optimisation group. The Truck Optimisation option will automatically assign an optimal truck fleet. The user specifies the percentage of theoretical maximum productivity (productivity for an infinitely large truck fleet) and the system will assign the number of trucks necessary to achieve this target. The assignment is done on a block by block basis. The number of trucks assign to each block is reported and displayed in the productivity banner at the top of the Active Terrain Window during simulation. Report is also produced which lists the number of trucks for each block.
To use Truck Optimisation the Optimise Truck Assignment checkboxes first selected. The following procedure is then used:
•Add the maximum number of allowable trucks to each Subsequence using the procedures described above. This number of trucks can either be an ideal (excessive) number of trucks such that the system will establish the true optimum, or it may be a lesser number consistent with the available truck fleet in which case the system will select an optimum up to but not greater than this number.
•Run the simulation and select the appropriate option on theResults page of the Simulation Settings to generate a report which will contain the optimal truck numbers for each block.
Truck Optimisation is further explained in the topic Truck and Excavator Assignment Example.
Use Trucks group. When Trucks are created a nominated number of Trucks are created for each Truck Type. Each Truck of a particular Type is given a unique number. This makes it possible to track the utilisation of specific Trucks. This group of radio buttons controls whether trucks are allocated on an anonymous basis or if specific trucks are allocated. The Use Trucks group has two options, Only Specific Trucks and Any Available Trucks. The default setting is Any Available Trucks. With this setting selected any available Trucks of a particular Type will be allocated to a Subsequence, so this effectively allocates trucks on an anonymous basis. The second option Only Specific Trucks allows specific trucks (trucks a particular numbers) to be allocated to Subsequences.
Most typically the default Any Available Trucks option is used. However situations can arise in highly detailed short-term scheduling, and in multi-pit simulation where the use of specific truck allocation is appropriate.
Add Trucks button, Delete Trucks button and Trucks list (right column of dialog). Clicking the Add Trucks button opens the Add Trucks dialog:
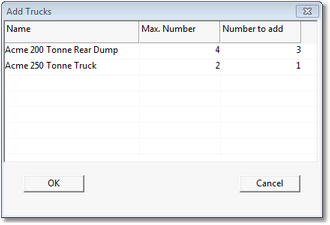
Add Trucks dialog
The Add Trucks dialog lists all Truck Types which have been included in the Simulation together with the maximum number available. For each Truck Type there is a field labelled Number to add. The number of Trucks of each Type which is to be assigned to the selected Subsequences is keyed in to the Number to add field. In the example in the figure above 3 of the 200 Tonne Rear Dump and 1 of the 250 tonne Trucks are to be added. When complete the OK button is clicked. The focus returns to the Assign Trucks to Subsequences dialog and be added Trucks will now appear in the Trucks list in this dialog:
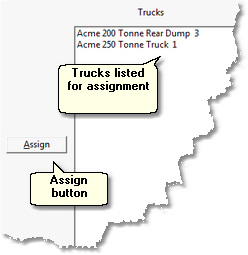
Assign Trucks to Subsequences dialog, Trucks list
If an incorrect Truck Type or number appears on the list,this Truck Type can be selected by point and click and then the Delete button will remove them from the list. If more or other Type Trucks need to be added the Add Trucks button can be clicked a second time and the Trucks edited.
Assign button. Once the Subsequences for Truck Assignment have been selected, and the required trucks added to the Trucks List the Assign button is clicked to form the assignment. If the Assign button is not clicked and an attempt is made to close the Assign Trucks to Subsequences dialog a message box will be produced requesting that the assignment be completed.
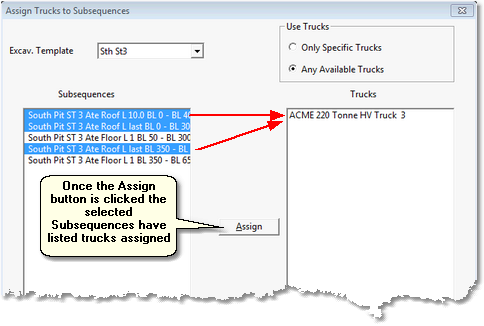
Assign Trucks to Subsequences dialog, Trucks Assigned state
Truck Loading Position group. The Truck Loading Position group consists of two radio buttons labelled At Bottom of Current Lift and Add Top of Current Lift. If the excavator is to operate at the top of the current lift in backhoe mode, filling trucks also located at the top of lift then be At Top of Current Lift is selected. If the excavation operation is conducted from the floor of the lift the At Bottom of Current Lift is selected.
The procedure for assigning Trucks to Subsequences is:
1.Open the Assign Trucks to Subsequences dialog.
2.In the Excavation Template pulldown list select the Excavation Template for the first strip to have Trucks assigned.
3.If necessary, set the appropriate filters to isolate Subsequences with common Truck assignment.
4.In the Subsequences list select all Subsequences with the common Truck assignment (use Ctrl and Shift Click to multiple select).
5.Click the Add Trucks button. In the Add Trucks dialog select the number of Trucks of each Type to be assigned to the selected Subsequences. When complete Click Save and Close.
6.On the Assign Trucks to Subsequences dialog click the Assign button to complete the Truck assignment.
7.Set the appropriate truck loading position from the options in the Truck Loading Position group.
8.If more Subsequences in the current Subsequences list require truck assignment repeat the above procedure to assign trucks to these Subsequences.
9.If Subsequences from other Excavation Templates require Truck assignment select the next Excavation Template from the Excavation Template pulldown list and repeat the above procedures.
The above procedures are demonstrated in the following topic: Truck and Excavator assignment example.