|
<< Click to Display Table of Contents >> Using Preset Productivities |
  
|
|
<< Click to Display Table of Contents >> Using Preset Productivities |
  
|
The following description applies to running a Supersequence using the Simulate/Run Supersequence command with the Block Excavation Order option: Interleave Blocks with Times in Step.
When the Simulation is run in this manner each block is excavated in order and an excavation time is assigned using the blocks' volume and an assigned Preset Productivity. Where the Supersequence has a branched structure, two or more Subsequences may be active, and simulated, at the same time. This equates to two excavation fleets operating in parallel on different parts of the mining operation. When these parallel branches are simulated they are kept synchronised using the accumulated excavation times for the blocks in each parallel branch. The rate at which a particular branch of a Supersequence advances will depend on the volumes of material in the various blocks and the assigned Preset Productivities for the various Subsequences.
Typically a branch will represent the excavation tasks assigned to a particular fleet and hence all Subsequences in a branch will typically have the same Preset Productivity, although this is not essential.
A simple example of the use of a multiple branch Supersequence would be a pit which has a pre-strip fleet stripping down to a particular horizon followed by the main fleet removing the balance of waste and uncovering a coal seam. In this case the pre-strip fleet will typically strip one strip in advance. The Subsequences for the pre-strip fleet will be in one branch of the Supersequence and the main fleet will be in the parallel branch. In such an operation it is necessary that the pre-strip fleet completes the advanced stripping before the main fleet completes stripping in the current strip. The following figures illustrate this:
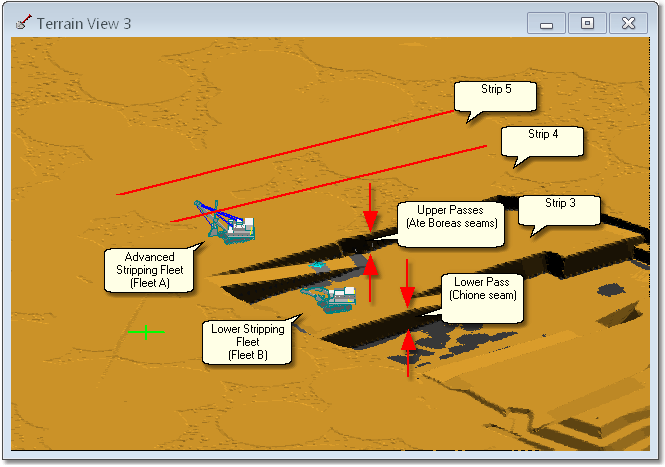
Preset Productivity Example, Pit Layout.
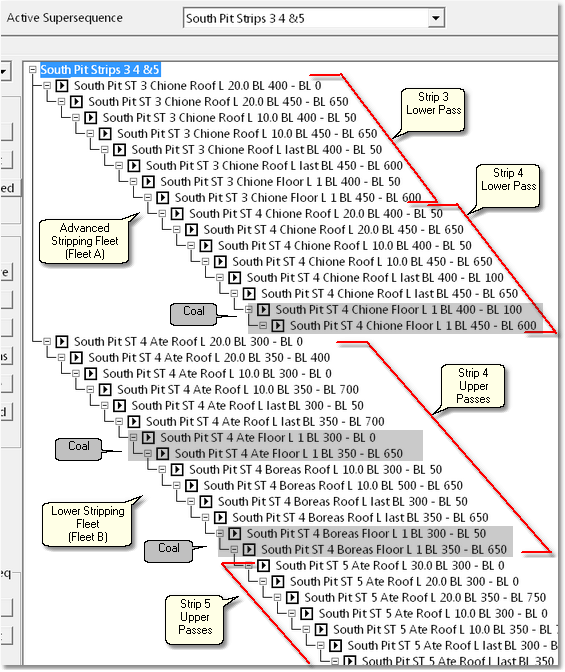
Preset Productivity Example - Supersequence.
In the above example there are two waste stripping fleets and a coal fleet operating. Fleet A excavates the waste of the to upper seams an Fleet B excavates the waste for the lower seam. Fleet A operates one strip in advance of Fleet B. The figure above illustrates the Supersequence. This Supersequence has two branches one for Fleet A and one for Fleet B. In addition a coal fleet is assumed to be available as required. The right-hand branch of the Supersequence is for Fleet A and the left-hand branch is for Fleet B. The sequence commences with the pit in the starting state to excavate the upper waste for Strip 4 and the lower waste for Strip 3. Fleet B excavates Strip 3 lower passes then moves to the Strip 4 lower passes. Fleet A, in parallel, excavates Strip 4 upper passes followed by Strip 5 upper passes. The relative productivity of the two fleets must be such that Fleet A completes the Strip 4 upper passes before Fleet B moves to the Strip 4 lower pass.
This task can be modelled by assigning Preset Productivities. A Preset Productivity would be created and named for the following:
1.Fleet A
2.Fleet B
3.Coal Fleet
The Fleet A Preset Productivity would then be applied to all of the lower pass waste Subsequences, the Fleet B Preset Productivity would be applied to all of the upper waste pass Subsequences and the Coal Fleet Preset Productivity would be applied to all coal Subsequences.
At this stage the simulation would be run and the relative rate of advance of the two waste fleets would be observed. If Fleet A does not perform the required advanced stripping before Fleet B moves to strip 4 lower pass then either the Fleet A productivity needs to be increased or the Fleet B productivity needs to be decreased. The Preset Productivities can be varied in a manner that reflects either different equipment fleet or different shift allocation. In this way the appropriate productivities for the two Fleets can be readily assessed.
The following topic explains the procedure for assigning Preset Productivities and following this is a video clip which illustrates the set up and running of the above example.
Preset Productivities are set via the the Run Supersequence Options dialog. The Run Supersequence Options dialog can be accessed either by the menu option Simulation/Run Supersequence or by clicking the Simulation Settings toolbar button when in Auto mode:
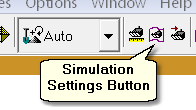
Simulation Settings Toolbar Button.
This dialog allows a Supersequence to be run, and also allows Preset Productivity is to be set. At the top of the Run Supersequence dialog is the Assign Preset Productivities button:
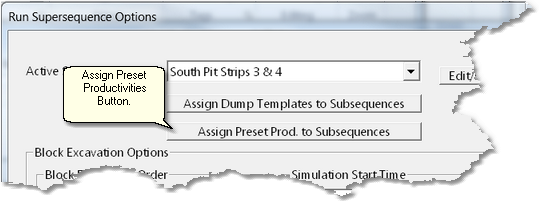
Assign Preset Productivities Button.
Clicking this button opens the Assign Preset Productivities dialog:
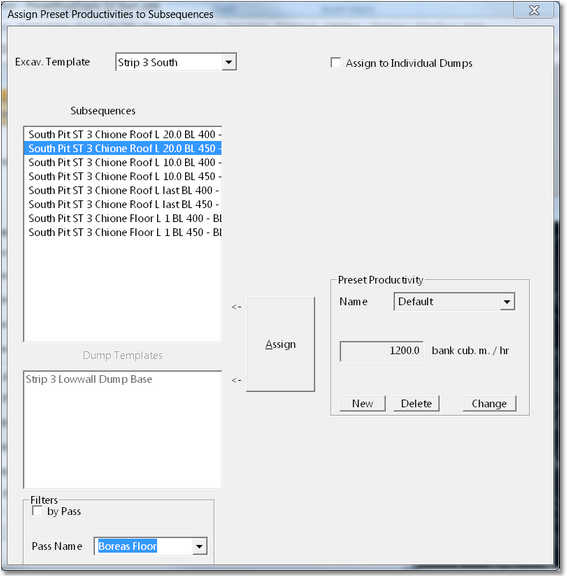
Assign Preset Productivities Dialog.
On the right-hand side of this dialog is the Preset Productivity Group. At the top of this group is Preset Productivity pulldown list. This list contains all existing Preset Productivities. Below this pulldown is the Productivity field, this shows the productivity for the currently selected Preset Productivity (that which appears in the Preset Productivity pulldown list). On the bottom left of this group is the New button. Clicking the New button allows a new Preset Productivity to be created. This opens the New Preset Productivity dialog:
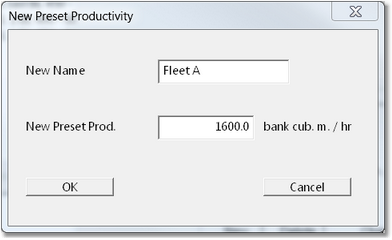
New Preset Productivity Dialog.
A Preset Productivity consists of a Name and Productivity. To create a new Preset Productivity the desired name is keyed into the New Name field and the productivity is keyed into the New Preset Productivity field. Once complete the OK button is clicked and focus returns to the Assign Preset Productivities dialog. The newly created Preset Productivity will appear in the Preset Productivity pulldown list. An existing Preset Productivity can be changed or deleted using the Change and Delete buttons in the Preset Productivity group.
At the top left corner of the Assigned Preset Productivities dialog is the Excavation Template pulldown list. The first step in assigning Preset Productivities to Subsequences is to select the Excavation Template to which the Subsequence is belong. Once the Excavation Template is selected all of its Subsequence is appear in the Subsequence is list (below the Excavation Template pulldown list).
The following procedure is used to assign Preset Productivities to Subsequences:
1.Create the desired Preset Productivities using the procedures described above.
2.Select the appropriate Excavation Template from the Excavation Template pulldown list.
3.In the Subsequence is list select the Subsequence is to which the Preset Productivity will be applied. Select using point and click, shift click and ctrl click.
4.Select the desired Preset Productivity from the Preset Productivity pulldown list.
5.Click the Assign button to assign the selected Preset Productivity to the selected Subsequences.
The Subsequences can potentially have several dumps assigned in the Dump Hierarchy. It is sometimes appropriate to apply different Preset Productivities to a Subsequence when different dumps are being used. For example, first dump in the Dump Hierarchy may be close to the excavation and the second may be much further away. The productivity will be highest when material is reporting to the first dump in the Hierarchy (closest dump). If this dump fills and material reports to the next dump in the Hierarchy (more distant dump) productivity will drop.
To assign different Preset Productivities to the same Subsequence when different Dumps are being used check the Assign to Individual Dumps checkbox at the top right of the dialog. When this box is checked the Dump Templates list in the Assign Preset Productivities dialog will become enabled. Once the desired Subsequences are selected select the Dump or Dumps to which a particular Preset Productivity will apply, then select the appropriate Preset Productivity and click the Apply button. With the same Subsequence is selected select the next Dump and repeat the procedure to apply the appropriate Preset Productivity. When the simulation is conducted the appropriate Preset Productivity will be applied to the Subsequences when particular dumps are being used.
At the bottom left of the dialog is the Pass Filters group. The Excavation Template may contain several passes and often it is appropriate to apply different preset productivities to different Passes. When the Filter by Pass checkbox is selected the Pass Name pulldown list becomes enabled allowing a particular pass to be selected. with a particular Pass selected only Subsequences associated with that pass will appear in the Subsequence is list. This filtering process makes it easier to select the Subsequences to which a particular Preset Productivity will apply and minimises the risk of incorrect assignment of Preset Productivity.
The tutorial video Assigning Preset Productivities illustrates the basic procedure for assigning Preset Productivities.