|
<< Click to Display Table of Contents >> Assigning Roads to Subsequences. |
  
|
|
<< Click to Display Table of Contents >> Assigning Roads to Subsequences. |
  
|
In the previous exercise we created a system of roads capable of linking all of the Excavation Subsequences with all of the Staged Dumps in our Supersequence. This Supersequence includes the Strip 4 Ate and Boreas passes and Strip 3 Chione pass.
It is clear to the user which roads in the system will be used for which transport processes, however formal assignment of roads within 3d-DigPlus has not yet been conducted. In this exercise we will complete the assignment of Roads.
Each waste Subsequence has at least one Staged Dump assigned. The Strip 4 Ate and Boreas waste Subsequences have a hierarchy of two dumps assigned. For each Subsequence/Dump pair a unique system of Roads is required to link the excavation point to the dump point.
Haul routes for Strip 4 Ate and Boreas waste Subsequences.
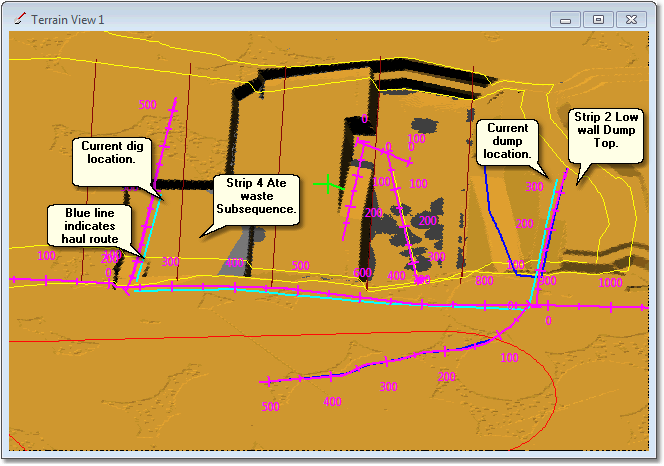
The following diagrams illustrate these haul routes. The diagram below shows the haul route when waste is reporting to the Strip 2 Low wall Dump Top:

Strip 4 Ate waste Subsequence Reporting to Strip 2 Low wall Dump Top, Haul Route.
The haul route shown above consists of the following Roads:
•Strip 4 Highwall Ramp.
•Main Haul Road North.
•Strip 2 Low wall Dump Top Ramp.
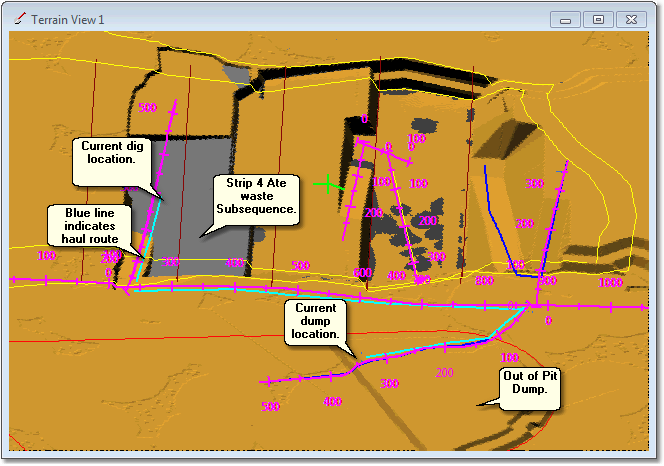
•The diagram below shows the haul route when waste is reporting to the Out of Pit Dump:

Strip 4 Ate Waste Subsequence Reporting to Out of Pit Dump, Haul Route.
The haul route shown above consists of the following Roads:
•Strip 4 Highwall Ramp.
•Main Haul Road North.
•Out of Pit Dump Ramp.
Haul routes for Strip 3 Chione waste Subsequences.
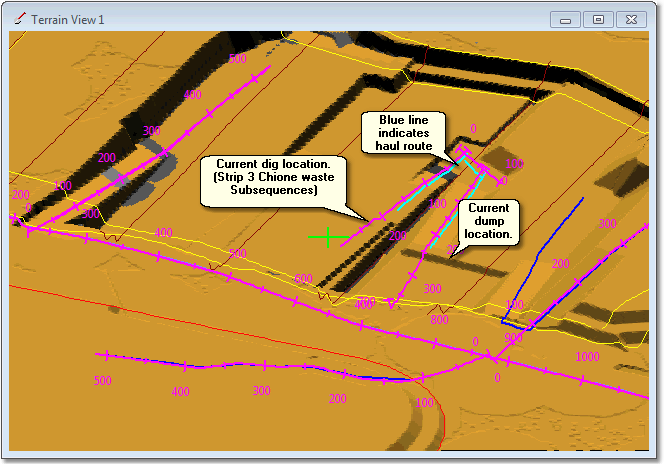
The Strip 3 Chione waste Subsequences have only one assigned dump, the Strip 3 Low wall Base Dump. Therefore only one set of Roads needs to be assigned to these waste Subsequences. The figure below illustrates the required Haul Roads:

Strip 3 Chione Waste Subsequences Reporting to Strip 3 Low wall Dump Base, Haul Route.
The haul route shown above consists of the following Roads:
•Strip 2 Highwall Ramp.
•South Pit Main Haul Pit Floor.
•Strip 3 Low wall Dump Base Ramp.
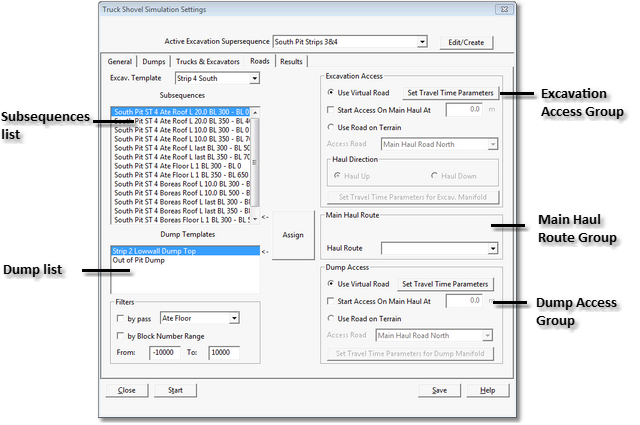
Roads are assigned to Subsequences using the Truck Shovel Simulation Settings dialog and selecting the Roads page. This dialog page is shown in figure below:

Truck Shovel Simulation Settings, Roads Page.
The general procedure for assigning Roads is similar to the procedures described in the previous topic for assigning Equipment. The Roads page of the Truck Shovel Simulation Settings dialog includes a Subsequences list and a Dump list. Groups of Roads sharing a common Dump hierarchy are selected and once selected they have Roads assigned.
The steps involved in assigning roads are:
•Select the Excavation Template (Excavation Template pulldown list at top of page) which contains the Subsequences which are to have the Roads assigned.
•In the Subsequences list, group select a set of Subsequences with a common Dump Hierarchy. The Dump Hierarchy will appear in the Dump list.
•In the Excavation Access group select the radio button for the desired access modelling type (we will be using Road on Terrain). If using Road on Terrain select the Road to be used for the Excavation Access. Using the appropriate buttons in this group set up the parameters for the road model.
•In the Main Haul Route group select the Road which models the Main Haul Route.
•In the Dump Access group select the radio button for the desired access modelling type (we will be using Road on Terrain). If using Road on Terrain select the Road to be used for the Dump Access. Using the appropriate buttons in this group set up the parameters for the road model.
•Select the next Dump in the Hierarchy and use the above procedures to modify the Roads set up as required.
•Select the next group of Subsequences with a common Dump Hierarchy and repeat the above process.
•Select the next Excavation Template containing Subsequences requiring Road assignment and repeat the above procedures.
Excavation and Dump Manifolds.
We will be using the Road on Terrain option for excavation and dump access. When using this type of model the nominated access Road will model the haulage from the junction with Main Haul Route to the toe of Excavation Access, and for dumps from the junction with Main Haul Route to the crest of the current Dump access. The haulage from these crests and toes to the excavation or dump location is modelled via Excavation Manifolds and Dump Manifolds. The Excavation Access and Dump Access groups include buttons which access the manifold parameters. We will be using the default parameters, however a detailed description is contained in the User Manual topic Virtual Roads and Manifolds.
The tasks for this topic involve selecting the waste Subsequences used in the Supersequence and for each dump in the hierarchy assigning the appropriate set of Roads.
The steps involved are:
•Open the Simulation Settings Dialog and go to the Roads page.
•Select the Strip 4 Excavation Template.
•Select all Ate and Boreas waste pass Subsequences.
•Select the first Dump in the Hierarchy: Strip 2 Low wall Dump Top, and assign following roads:
▪Excavation Access: Strip 4 Highwall Ramp.
▪Main Haul Route: Main Haul Road North.
▪Dump Access: Strip 2 Low wall Dump Top Ramp.
•Select the next Dump in the Hierarchy: Out of Pit Dump, and assign the following roads:
▪Excavation Access: Strip 4 Highwall Ramp.
▪Main Haul Route: Main Haul Road North.
▪Dump Access: Out of Pit Dump Ramp.
•Select the Strip 3 Excavation Template.
•Select all Chione waste pass Subsequences.
•These Subsequences have only one assigned Dump, Assign the Following Roads:
▪Excavation Access: Strip 2 Highwall Ramp.
▪Main Haul Route: South Pit Main All Pit Floor.
▪Dump Access: Strip 3 Low wall Dump Base Ramp.
The following video clip demonstrates the assignment of Roads to Subsequences:
Continue with the file open for the previous exercise or load the file Topic 14_Complete.3dd, on completion save the file: Topic15_Complete.3dd
3d-DigPlus must be in Truck & Shovel Mode after the tutorial file is loaded:

Simulation Pulldown - Truck & Shovel Mode.
Save the 3d-Dig file as:
Topic15_Complete.3dd
Assigning Roads and Accesses to Subsequences.