|
<< Click to Display Table of Contents >> Assigning Equipment Fleets to Subsequences. |
  
|
|
<< Click to Display Table of Contents >> Assigning Equipment Fleets to Subsequences. |
|
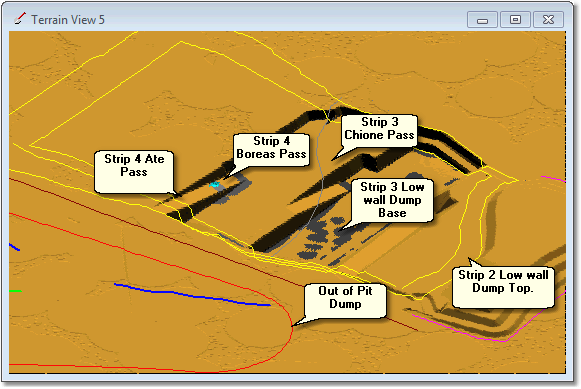
This Supersequence we are modelling has two distinct components:
•Strip 4 Ate and Boreas waste passes. Material reports to Strip 2 Low wall Dump Top and Out of Pit Dump.
•Strip 3 Chione waste passes. Material reports to Strip 3 Low wall Dump Base.
The figure below illustrates these two Subsequence components and the associated Dumps:
The Strip 4 Ate and Boreas waste material requires moderate haul distance and significant elevation of waste. The Strip 3 Chione waste reports to the adjacent void with short haul and limited elevation. As a result the Strip 4 Ate and Boreas waste Subsequences have a greater truck requirement than the Strip 3 Chione waste Subsequences. Both Subsequences will have a single excavator, and will start with six trucks assigned to Strip 4 waste Subsequences and four trucks to Strip 3 waste Subsequences.
Excavators and Trucks are assigned to Subsequences via the Trucks & Excavators page of the Truck Shovel Simulation Settings dialog:

Truck Shovel Simulation Settings Dialog, Trucks & Excavators Page.
At the top of the Truck Shovel Simulation Settings dialog is the Active Excavation Supersequence pulldown list. Using this pulldown list the Supersequence which is to be used with the current Simulation is selected.
There are two equipment pulldown lists on the Trucks & Excavators page, Truck Type and Excavator Type. Using these pulldown lists the required Truck and Excavator are selected. In our example we have only one Type for both Trucks and Excavators so this Type will appear by default in the Pulldown list.
Once an equipment Type is selected the number available (which we set up in the previous exercise) will appear in the Number Available field. This should show 7 for Trucks and 1 for Excavators. Any number of items of an equipment Type, up to the Number Available, can be selected for the simulation using the Number in Simulation field. We will select 6 Trucks and 1 Excavator.
Once the equipment Types and Number in Simulation have been set equipment can be assigned to Subsequences.
Assigning Trucks.
Trucks are assigned by clicking the Assign Trucks to Subsequences button which opens up the Assign Trucks to Subsequences dialog:

Assign Trucks to Subsequences Dialog.
At the top of the Assign Trucks dialog is the Excavation Template pulldown list. Via this list all Excavation Templates associated with the Active Supersequence (for the Simulation) are available for selection. Each Excavation Template is selected in turn and Trucks assigned to it is Subsequences.
In the figure above the Strip 4 Excavation Template is selected. This Template contains all of the Subsequences for the Strip 4 Ate and Boreas waste passes. All of these Subsequences share a common Dump Hierarchy and will have the same Trucks assigned. Furthermore the same number of trucks will be assigned to the Subsequences for both Dumps in the Dump Hierarchy. Consequently they can all be group selected and the Trucks can be assigned to the group.
To assign trucks click the Add Trucks button at the bottom of the Assigned Trucks List. This will open the Add Trucks dialog:

Add Trucks Dialog.
The Add Trucks dialog lists all of the Truck Types available and gives the maximum number available for selection. The required number is keyed into the Number to add field. When the number of Trucks is input click OK and the Trucks will appear in the Assigned Trucks list:

Assign Trucks to Subsequences Dialog Showing Assigned Trucks.
To complete the Assignment the Assign button is clicked. If you fail to click the Assign button a warning message will be issued when you exit the dialog.
Once the Truck assignment is complete Excavators must be assigned.
Assigning Excavators.
Excavators are assigned by clicking the Assign Excavators to Subsequences button which opens up the Assign Excavators to Subsequences dialog:

Assign Excavators to Subsequences Dialog.
At the top of the Assign Excavators dialog is the Excavation Template pulldown list. Via this list all Excavation Templates associated with the Active Supersequence (for the Simulation) are available for selection. Each Excavation Template is selected in turn and Excavators assigned to its Subsequences.
In the figure above the Strip 4 Excavation Template is selected. This Template contains all of the Subsequences for the Strip 4 Ate and Boreas waste passes. All of these Subsequences will have the same Excavator fleet assigned. Consequently they can all be group selected and the Excavator can be assigned to the group.
To assign Excavators click the Add Excavators button at the bottom of the Assigned Excavators List. This will open the Add Excavators dialog:

Add Excavators Dialog.
The Add Excavators dialog lists all of the Excavator Types available and gives the maximum number available for selection. The required number is keyed into the Number to add field. When the number of Excavators as input click OK and the Excavators will appear in the Assigned Excavators list:

Assign Excavators to Subsequences Dialog Showing Assigned Excavators.
To complete the Assignment the Assign button is clicked. If you fail to click the Assign button a warning message will be issued when you exit the dialog.
The equipment for the Strip 3 Chione waste passes is assigned in a similar manner.
The following video clip illustrates the process of Equipment assignment:
Continue with the file open for the previous exercise or load the file Topic 13_Complete.3dd, on completion save the file: Topic14_Complete.3dd
3d-DigPlus must be in Truck & Shovel Mode after the tutorial file is loaded:

Simulation Pulldown - Truck & Shovel Mode.
Save the 3d-DigPlus file as:
Topic14_Complete.3dd
Assigning Trucks and Excavators to Subsequences.