|
<< Click to Display Table of Contents >> Procedure for Assigning Roads on Terrain |
  
|
|
<< Click to Display Table of Contents >> Procedure for Assigning Roads on Terrain |
  
|
The procedures for assigning Roads to Subsequences and Dumps will be demonstrated via an example operation.
The example pit, one which has been used in previous topics, involves a single strip with three passes. The three seams mined are Ate, Boreas and Chione. The figures below illustrates the example operation, the Dumps and the Road network.
Note that the names of all Excavation Access Roads in EA (Excavation Access) , and the names of all Dump Access Roads end in DA (Dump Access).
Waste from the first two passes is hauled up a high wall ramp to ground level and reports firstly to the Strip 2 low wall dump top, when this is full remaining waste reports to the Out of Pit Dump 1. Waste from the lower (Chione) pass reports to the Strip 3 low wall dump base, which is built on the void of the previous strip.
The following table details the waste passes, roads and dumps. All coal Subsequences are mined without dumping and material reports to Material Log.
Pass |
Dump |
Excavation Access Road |
Main Haul Road |
Dump Access Road |
Ate waste |
South Pit St2 Low Wall top |
Sth Pit S3 HW Ramp EA |
South Pit Main Haul |
St2 LW Dump Top DA |
Ate waste |
Out of Pit Dump 1 |
Sth Pit S3 HW Ramp EA |
South Pit Main Haul |
Out of Pit Dump Ramp DA |
Boreas waste |
South Pit St2 Low Wall top |
Sth Pit S3 HW Ramp EA |
South Pit Main Haul |
St2 LW Dump Top DA |
Boreas waste |
Out of Pit Dump 1 |
Sth Pit S3 HW Ramp EA |
South Pit Main Haul |
Out of Pit Dump Ramp DA |
Chione waste |
Strip 3 low wall dump base |
Sth Pit S2 HW Ramp EA |
Main Haul Pit Floor |
St3 LW Dump Base DA |
Note that all Subsequences from the Ate and Boreas waste passes have the same Dump Hierarchy of two Dumps. Hence there are two sets of Road assignments for these passes. The Chione pass has only one associated dump and hence one road network. Note also that all Subsequences associated with each pass and the same Dump Hierarchy. If passes contain Subsequences with differing Dump assignments then Road assignments can vary from Subsequence to Subsequence within a Pass.
In this example the table above was created to demonstrate clearly the process of Road assignment. If Subsequences, Dumps and Roads are appropriately named is generally not necessary to manually tabulate the road assignment prior to assigning the roads in 3d-DigPlus.
To assign Roads open the Simulation Settings dialog by clicking on the Simulation Settings Toolbar button:
Simulation Settings Toolbar button
In the Simulation Settings dialog click on the Roads to open the Roads page. The first task is to ensure that the correct Active Supersequence is selected and then select the Excavation Template. This will ensure that the required Subsequences appear in the Subsequences list:
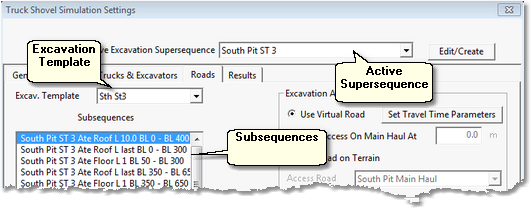
Simulation Settings dialog, Assign Roads page
Once the required Subsequences are in the Subsequences list Road assignment can commence.
The first step in assigning Roads is to select the Subsequence or group of Subsequences to which Roads are to be assigned. When a Subsequence is selected the assigned Dumps (Dump Hierarchy) appear in the Dump Templates list:
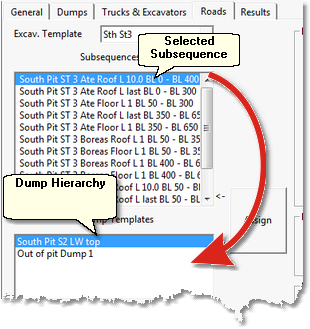
Selected Subsequence and Dump Hierarchy
Note that where the Dump Hierarchy consists of two or more Dumps only one dump at a time, in the Dump Templates list, can be selected. Road assignment must be conducted for each dump separately as nearly always each dump will require different Road system. At the very least each dump will generally require different Dump Access Road.
Frequently a number of Subsequences share a common Dump Hierarchy. In our example all Ate and Boreas waste Subsequences report to the same Dump Hierarchy. When Subsequences with a common Dump Hierarchy are selected the Dump Hierarchy appears in the dump templates list. The following figure shows all Ate and Boreas waste Subsequences group selected with their common dump Hierarchy:
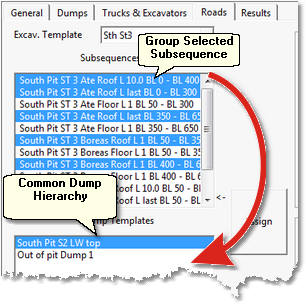
Group selected Subsequences and Common Dump Hierarchy
It is usually the case where Subsequences share a common Dump Hierarchy that the Road components required to service each of the Dumps is also common to the Subsequences. In such cases the Subsequences can be group selected and the roads required for each dump assigned in turn to the full group of Subsequences. Note that it is sometimes the case that although two or more Subsequences share a common Dump Hierarchy the road network requirements vary between Subsequences. In such cases group selection can only be applied to those Subsequences which share not only a common Dump Hierarchy but common Roads. Non-conforming Subsequences must have Roads assigned individually.
In the example used here many of the Subsequences do share a common Dump Hierarchy and common Road requirements. So once group selected all the Subsequences can have the Road components assigned at the same time.
In the figure above the Ate and Boreas waste Subsequences are group selected. There are two Dumps in the Dump Hierarchy. With the Subsequences group selected and the first of the Dump selected Road assignment can begin.
From the table above the Road assignments for the Ate and Boreas waste passes are:
Excavation Access: Sth Pit S3 HW Ramp EA
Main Haul Road: South Pit Main Haul
Dump Access: St2 LW Dump Top DA
The following figure shows the Roads page of the Simulation Settings dialog with these Roads assigned:
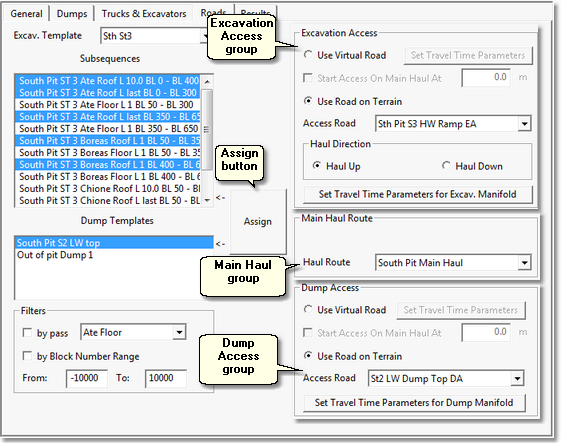
Simulation Settings dialog, Roads page, Road assignment complete
Down the right-hand side of the Roads page are the Excavation Access, Main Haul and Dump Access groups. It is within these groups that the Roads are selected.
The Excavation Access group has the following elements and functioning:
•Use Virtual Road radio button. If this radio button is selected the Virtual Road method is used to model the access. This topic deals with Roads on Terrain, the Virtual Road option is covered in the following topic.
•Use Road on Terrain radio button. If this radio button is selected the Road on Terrain method is used to model the access.
•Access Road pulldown list. When Use Road on Terrain is selected this pulldown list is enabled. It contains a list of all Roads in the current 3d-DigPlus file. From this list the required Excavation Access is selected. In the above figure the selected Road is Sth Pit S3 HW Ramp EA.
•Haul Direction radio buttons. Excavation Access Roads can perform in either haul up or haul down modes. For the selected Subsequences material is hauled up the ramp to the surface so haul up mode is selected. These options are explained further in the topic Excavation Access Roads.
•Set Travel Time Parameters for Excav. Manifold button. Excavation Manifolds are always modelled as Virtual Roads. Clicking the Set Travel Time Parameters for Excav. Manifold button opens up the Virtual Roads dialog box. The setup of Virtual Roads for Manifolds is explained further in the topic Virtual Roads and Manifolds. The default settings for Excavation Manifolds are suitable from most situations and generally do not need to be modified. If a particular manifold is different to the norm and cannot be adequately modelled with the default settings use this button to apply specific parameters. If most Excavation Manifolds are similar in form, but are not adequately modelled with the default settings, more suitable defaults can be applied using the Advanced Settings.
The Main Haul Route group contains the Haul Route pulldown list. This pulldown contains a list of all Roads in the current 3d-DigPlus file. It is used to select the Road to be used to Main Haul Route. In the above figure the selected road for Main Haul is South Pit Main Haul.
The Dump Access group has the following elements and functioning:
•Use Virtual Road radio button. If this radio button is selected the Virtual Road method is used to model the access. This topic deals with Roads on Terrain, the Virtual Road option is covered in the following topic.
•Use Road on Terrain radio button. If this radio button is selected the Road on Terrain method is used to model the access.
•Access Road pulldown list. When Use Road on Terrain is selected this pulldown list is enabled. It contains a list of all Roads in the current 3d-DigPlus file. From this list the required Dump Access is selected. In the above figure the selected Road is St2 LW Dump Top DA.
•Set Travel Time Parameters for Dump Manifold button. Dump Manifolds are always modelled as Virtual Roads. Clicking the Set Travel Time Parameters for Excav. Manifold button opens up the Virtual Roads dialog box. The setup of Virtual Roads for Manifolds is explained further in the topic Virtual Roads and Manifolds. The default settings for Dump Manifolds are suitable from most situations and generally do not need to be modified. If a particular manifold is different to the norm and cannot be adequately modelled with the default settings use this button to apply specific parameters. If most Dump Manifolds are similar in form, but are not adequately modelled with the default settings, more suitable defaults can be applied using the Advanced Settings.
the procedure for assigning Roads is as follows:
•Select the first group of Subsequences which have a common Dump Hierarchy and Road network.
•Select the First Dump in the Hierarchy.
•Using the Excavation Access, Main Haul and Dump Access groups select the appropriate Roads.
•Modify the default Excavation Manifold and Dump Manifold parameters if required.
•Click the Assign button.
•Select the Next Dump in the Hierarchy.
•Select and assign the appropriate Roads for this Dump.
•Repeat the above steps for all Subsequences.
In the figure above the first dump in the Dump Hierarchy has Roads assigned. The next step in this particular job is to assign Roads to the next Dump in the Hierarchy.figure below shows this dump Roads assigned:
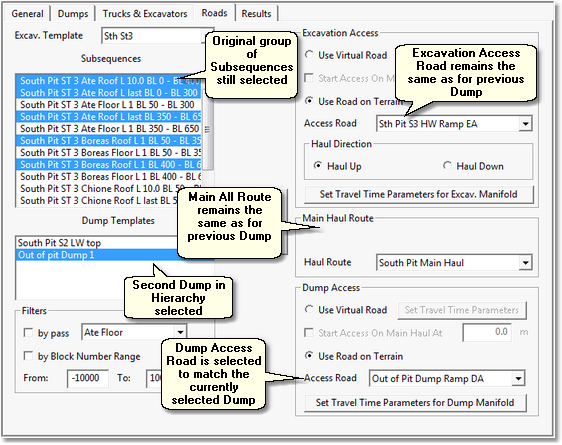
Simulations Settings Dialog, Roads Page, Road assignment for second Dump
At this stage Roads fully assigned for this group of Subsequences. Other Subsequence groups, with common Dump Hierarchies, are selected and similarly processed.
The following topic contains a video clip of the complete Road set up for this example pit.