|
<< Click to Display Table of Contents >> Running a Simulation |
  
|
|
<< Click to Display Table of Contents >> Running a Simulation |
  
|
The Simulate/Run Supersequence command will run a nominated Supersequence excavating each block of material and dumping its material in the nominated Dump.
In order to run this command the following set up is required:
•The system must be in Auto simulation mode:

Simulation Mode Pulldown, Auto Mode.
•There must be at least one Excavation Template set up with a Staged Excavation. Subsequences must exist for this Staged Excavation.
•At least one Supersequence must be assembled from the available Subsequences.
•Dump Templates must be assigned to the appropriate Subsequences. Note that it is not necessary that Dump Templates are assigned to all Subsequences. It is commonly the case that all waste Subsequences will have dumps assigned and coal Subsequences do not. When a Subsequence with no dumps assigned is excavated the material is removed from the topography and stored in the appropriate Material Log.
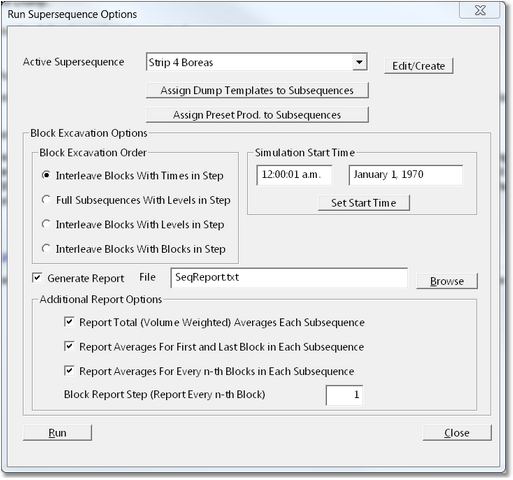
To run a Supersequence select the menu item Simulate/Run Supersequence. This will open the Run Supersequence Options dialog:

Run Supersequence Options Dialog.
Run Supersequence dialog consists of the following components:
Active Supersequence pulldown list. This list contains all Supersequences in the 3d-DigPlus file. The Supersequence which appears selected is the Active Supersequence and is the Supersequence that will be run.
Edit/Create (Supersequence) button. This button provide shortcut access to the Supersequence editor. The usual design practice involves creating an checking the Supersequence prior to to running. However if Supersequence requires some modification it can be accessed via this button.
Assign Dump Templates button. This button provides shortcut access to the Assign Dump Templates dialog. This dialog allows Dumps and Dump Hierarchies to be assigned to Subsequences. This dialog can be accessed elsewhere in the program.
Assign Preset Productivities button. This button allows Preset Productivities is to be created, named and assigned to Subsequences. Preset Productivity is a number which defines the production rate (BCM/hr) at which a particular Subsequence will be executed for simulation purposes. It is explained in detail in the following section.
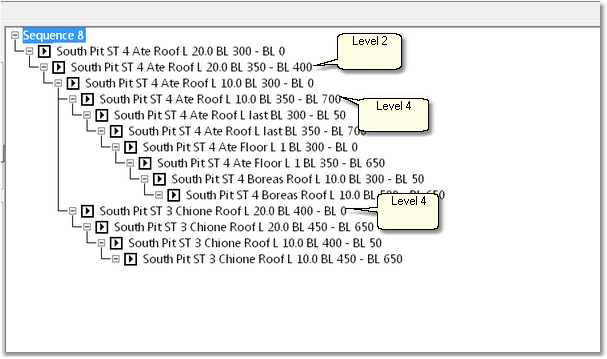
Block Excavation Order Group. The Block Excavation Order group contains options which control the way in which parallel branches in branch Supersequence are executed. The following description of the various options uses the notion of Level in a Supersequence. The level of any given Subsequence (in a Supersequence) is simply the count of Subsequences from the top of the Supersequence:

Levels in a Supersequence.
The options are:
Interleave Blocks with Times in Step (default). When this option is selected the simulation proceeds as follows:
The first block of the Supersequence is excavated and dumped and the elapsed time is determined using the volume and the assigned Preset Productivity (if the user has not assigned a Preset Productivity the default value is used). The calendar date is advanced by adding this time to the Simulation Start Time (see below). The simulation progresses on this basis until a branch in the Supersequence is encountered. The next block of the main branch (first post branch block) is simulated and the calendar time for that branch is determined. The first block in the secondary branch is then simulated and the calendar time for that branch is determined. The next block to be simulated is that for that branch which has the earliest calendar time. The process of comparing calendar times for the parallel branches and determining the following block to excavate continues on this basis. In this manner parallel branches are simulated and Synchronised in time with a level of resolution of one block. This process applies in the same manner when three or more parallel branches are encountered.
Full Subsequences with Levels in Step. This option simulates parallel branches by simulating complete Subsequences for one branch before moving on to simulate the complete Subsequence for the parallel branch at the same level. Branches are not kept synchronised in time.
Interleave Blocks with Levels in Step. This method excavates two or more parallel branches, which start at the same level, by excavating one block from the current Subsequence in one branch then excavating a block from the current Subsequence in the parallel branch. If the to parallel Subsequence is have different block count (this will typically be the case) the branch with the smallest block count will finish first. With this method two Subsequences, from parallel branches, at the same level will both be completed prior to simulating Subsequences at the next level down.
Interleave Blocks with Blocks in Step. This method simply excavates blocks in turn from parallel branches without regard for the Subsequence levels.
Simulation Start Time Group. This group consists of two fields which display the start date and time for the Simulation. This start time is entered by clicking the Set Start Time Button, which opens a calendar dialog allowing the user to input the Simulation start time. Note that this group is only enabled when the Block Excavation Order option is set to Interleave Blocks with Times in Step.
Simulation Report Group. This group controls the generation of a report file for the Simulation. It contains the following elements:
Generate Report checkbox. When this checkbox is selected a text file is generated that contains summary information for the Simulation.
Report File Field. This field allows the user to input the name of a report file.
Browse Button. The Browse button allows the user to browse to the folder where the report will be generated.
Report Options Checkboxes. These checkboxes control various report options as follows:
Report Total Averages each Subsequence. When this option is selected average productivity data for every Subsequence will be reported.
Report Averages for First and Last Block in each Subsequence. When this option is selected productivity averages for the first and last block of each Subsequence are reported.
Report Averages for every nth Block in Each Subsequence. When this option is selected the user inputs value for 'n' in the Block Report Stepped field. Productivity averages for every nth Block are then generated and included in the report file.
Run Button. The Run Button will initiate the simulation.
 Key Information – Capturing Video of a Simulation.
As the simulation progresses the process is animated in real-time in the active Terrain Window. This animation can optionally be captured either as a series of bitmap files or video file. The various capture options are set in the Capture Page of the Supersequences Editor. The options for the capture file type and the capture folder are set in the main menu Options/Capture Settings.