|
<< Click to Display Table of Contents >> Creating and Viewing Animations |
  
|
|
<< Click to Display Table of Contents >> Creating and Viewing Animations |
|
The simulation processes conducted in 3d-DigPlus can be used to build an animation of the development sequence. The animation is built in the form of a slide show. there are two modes of capture; individual slides and video. Both the slide and video format animation run independently of 3d-DigPlus and a freely distributable.
Animations can be captured either manually or automatically. Manual capture involves the user capturing slides individually as required. The various Simulation modes in 3d-DigPlus contain their own automated capture settings. As these simulations proceed the video is captured automatically with the capture detail being controlled by various settings. This auto capture is described in detail in the topics for the various Simulation modes. The following topics describe the general principles of capture and the manual capture mode.
The basis of the animation is a sequence of bitmap files acquired during the design process. These images are always of the active terrain window. Therefore, the first step prior to collecting any images is to set up a terrain window with a suitable viewpoint. The quality of the slide show is critically dependent on this view setup. Setting up a suitable view requires a little practice and the following points should be kept in mind:
•The viewpoint and the window size should remain constant from slide to slide. If the viewpoint is changed regularly, a jumpy and illegible slide show will result. It is acceptable to change the viewpoint occasionally as the mining process moves, but these changes should be relatively infrequent.
•The degree of zoom is very important. If the viewpoint is too distant, it will be hard to discern detail. If the viewpoint is too close, it is hard to get an overview of the process. In general new users tend to zoom in too close.
•Rendered views are usually used for slide shows. The light source angle is important. Try to avoid light sources that illuminate from “behind” the viewpoint as they produce a washed out image. A light source should be chosen which makes important topographic detail, such as highwalls, clear.
•Remember that the bigger the window from which the slides are taken the more disk space the resultant slide show will take up. Also, keep in mind the computers on which the show will be viewed. If you have a very high-resolution screen and you acquire images from a maximized window, the slide show may not fit on a computer screen of lower resolution.
•A High Color (16 bit) setting on your Display Properties will produce images, which take up significantly less space than True Color (24 bit), usually with little or no loss of image quality.
When slides are acquired they are given a name and saved to disk in a manner that is controlled by settings. These settings are accessed via Options | CaptureSettings. This command brings up the Capture Settings dialog box:

Capture Settings dialog.
The Directory field and associated Browse button allows you to select a directory in which to save the files.
The files are automatically named using a Base Name and a Current Number. The Current Number is indexed and appended to the base name to get a new file name each time a picture is captured. The Base Name can be taken from the 3d-DigPlus file name or from a name you nominate and save with the 3d-DigPlus file. These features are all controlled via the Capture Settings dialog box.
It is best to create a special folder for the slide-show files. This should be a subdirectory to your working directory. Never store two sets of slide show files in the same folder.
Using the option to base captured file names on the 3d-DigPlus file name should generally be avoided. If you save to a new file as the job progresses, the base name for the picture files will change. Hence, the resulting picture file set will span several base names making slide show assembly more difficult.
As soon as the settings have been changed, the 3d-DigPlus file should be saved.
As the simulation progresses the picture files can be captured manually or automatically. To capture a picture manually click on the Capture Window Toolbar button:
Capture Window Toolbar button.
Automatic capture takes place as part of the simulation process and is available in various modes. In Simulation modes the auto capture is set in in the relevant Simulation Settings dialog.
Once the simulations and capture settings are set up, the slide show will be captured automatically as the work progresses. Simulating a complex mining process often involves several simulation processes and free excavation and dumping. The capture file name indexing spans all these processes. Therefore, each time a picture is captured it is added to the current list of index files regardless of whether it is captured by a dragline simulation, linked simulation or captured manually.
Remember that the window captured is always the active window. Hence, you must ensure that the window you want to capture is active each time simulation is started or a manual capture is performed. It is often convenient to have a frame view window for setting up the simulation and a rendered window to capture the slide show. In this case, be sure to click on the rendered window prior to simulation or capture.
Once a design job is complete the slide show will either consist of an avi video file or individual picture files.
If the individual file capture mode is selected there will be a sequence of files the common seed file name and sequential numbering. Most computers will associate the picture file with the appropriate installed software and most software will allow you to advance and retreat through the slides using the keyboard right and left arrow buttons.
The avi videos can be viewed with any video player software.
3d-DigPlus includes two utilities for viewing slideshows formed from individual picture files.PNGPlay will play any set of sequentially numbered image files. MNGEdit allows non-contiguous image files to be assembled in any order and produces an MNG file which can then be played using PNGPlay
Assembling a slide show involves setting the order in which the slides will appear and the time each slide will be shown on the screen. Typically A slideshow will consist of a contiguous set of numbered image files, and these can be played directly with PNGplay. If noncontiguous image files need to be grouped into one slideshow the utility MNGedit is used to assemble a slide show and PNGplay is used to show it.
As described above, slide shows are acquired throughout a simulation using a naming system which names files with a seed base name and a numerical extension. If all of the slide show files have been acquired from the one design, and all follow the one naming sequence, it is not necessary to manually establish the order in which the slides will appear. PNGplay will automatically play them in sequential order. In this case, assembly of the sequence with MNGedit is unnecessary.
MNGedit is used for several reasons:
•If you wish to compile a slide show using files from different designs that don’t follow sequential naming, MNGedit allows you to manually assemble the files in any desired order.
•If you wish certain key slides to have a different display time to others, MNGedit provides this flexibility.
•A slide show will typically consist of a large number of individual PNG files. MNGedit allows an assembled slides list to be saved as a single MNG file. This MNG file contains all the information necessary for PNGplay to play the slide show.
To summarize, on completion of a design job you will usually be able to instantly view the slide show using PNGplay. If you wish to customize the slide show, or add sequences from another design job this is done using MNGedit.
The PNGplay slide show viewing utility
PNGplay is a utility supplied with 3d-DigPlus. It is installed in 3d-Dig2000’s install directory along with other components of the 3d-DigPlus system. The following describes the procedure for playing a slide show consisting of sequentially numbered files.
PNGplay will also display slide shows stored in a single MNG file. Simply select the MNG file type when opening a file with the PNGplay filer (File | Open menu command).
PNGplay can be started via the Windows System Start menu (Start | Programs | 3dDig2000 | PNG Play). The PNGplay window will appear:
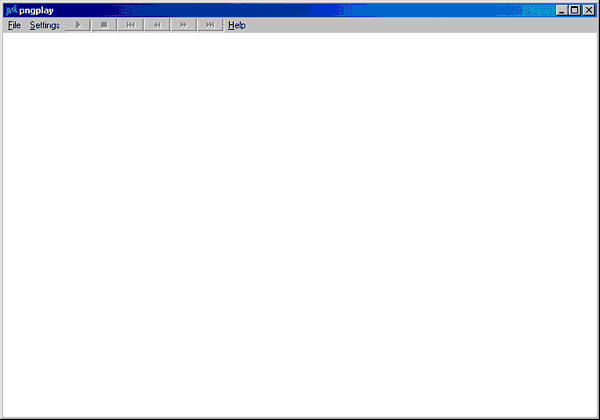
At the top of the window is the control bar. This contains three menu items and a set of video controls.
Select Files | Settings and the following dialog box will be produced:
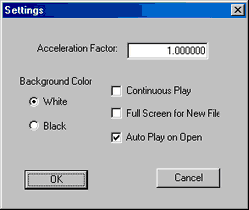
The slide show may be run automatically (auto play) or by manually stepping through the sequence using the video controls. Deselect the Auto play on Open checkbox to prevent the slide show from automatically running when a file is loaded. The Acceleration Factor controls how fast the slide show runs in Auto Play. Usually this is best left at the default value of 1. Larger values will cause slide shows to speed up.
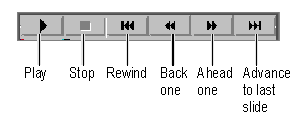
All that is required to run the slide show consisting of PNG files is to load one of the files. A slide show can consist of a large number of files. By selecting just one of the files in the sequence you tell PNGplay that you want to run all of the slides that share that base name and numerical sequence. Select File | Open. A file browser will be produced. Navigate to the directory where the slide show files are and select the first file in the sequence and click Open in the filer. The first slide will appear in the window. The video controls can now be used to run the show. The video controls are shown in the figure below.
When more complex slide show assembly is required, MNGedit is used. Start MNGedit using the Windows system command Start | Programs | 3d-Dig2000 | MNGedit. The MNGedit window will be produced:
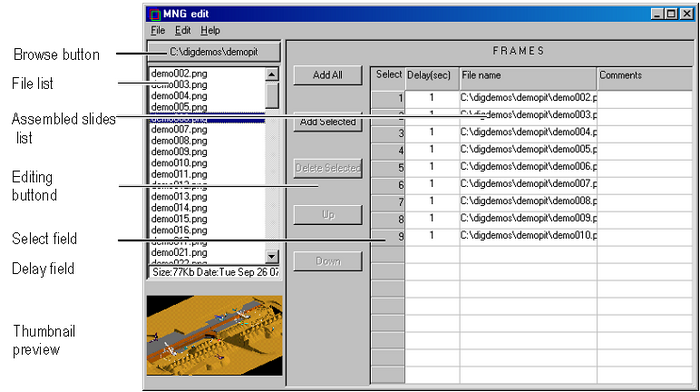
To assemble a slide show, click the Browse button in the top left-hand corner of the MNGedit window. This will produce a filer allowing you to navigate to the directory where the slide show files are located. Ideally, all the files to be assembled should be in the one directory although this is not essential. Once the directory is located using the browser its contents (*.PNG files) will appear in the raw file list at the left of the MNGedit window.
You can also import an MNG file into MNGedit and unpack it into its contained PNG files. This is done through the MNGedit menu command File | Import.
The assembly process begins by selecting files from the raw file list and adding them to the assembled slides list. To add a file point and click on it (in the raw file list) then click the Add button. The first file will appear at the top of the assembled list. Select the next file from the raw file list and again click add, it will be added to the bottom of the list. Usually the slide show consists of groups of sequentially numbered files. As the raw file list is sorted by name, these files will appear in the raw list in sequence. You can sort by name, date or size (use File | Sort). However usually the name sort will result in the desired sequence.
To select a block of files click on the first file, then press and hold the Shift key and click on the last file. All files between the first and last files (inclusive) will appear highlighted. To select (or deselect) additional files press and hold the Ctrl key and click on each file. Click the Add Selected button and all selected files will all be added to the bottom of the assembled list.
To add all the files in the current directory to the assembled list click the Add All button.
To change the delay time of a frame, first select it by clicking on the file’s number in the Select column. The selected file’s number is highlighted in red. Then select Edit | Change Time of Frames. The Delay Time dialog box will be produced:
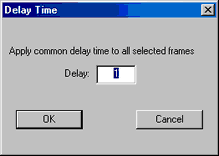
Key in the desired delay time in seconds and click OK. The delay time of individual files can also be changed by typing directly into the Delay field for each file. To change the time of a group of slides click on the select field of the first slide, then Shift and Click on the last. All the intervening slides will be selected. Repeat the above procedure to change the delay time. To deselect selected files use Edit | Deselect All Frames.
To delete frames from the list select the frames to be deleted then click the Delete Selected Frames button.
In the lower left corner of the window is the thumbnail view. This presents a thumbnail view of the currently selected file. This works with both the raw file list and the assembled list. The currently selected file’s thumbnail will appear in this window.
Files are added after the currently selected file (number highlighted in red). Ensure that the currently select file is located immediately before the location for the new files.
To move a file in the list there are two options:
1.You can delete the file, then select the file that is located immediately before the new location, and then add the file from the raw file list.
2.Alternatively you can select the file and use the up and down assembly buttons. These move the selected file up and down the assembled slide list one step at a time.
When the slide show list is assembled save it as a single MNG file using File | Save. PNGplay will display slide shows stored in a single MNG file. Simply select the MNG file type when opening a file with the PNGplay filer (File | Open menu command).