|
<< Click to Display Table of Contents >> Editing Subsequences |
  
|
|
<< Click to Display Table of Contents >> Editing Subsequences |
  
|
Every effort should be made when initially creating Subsequences to ensure that they are suitable for the intended simulation. However on occasions it will be necessary to modify a Subsequence due to some change in the intended operation or possibly an error in the set up of the initial Subsequence (eg. a particular Subsequence may have the wrong block span).
It is always possible to create new Subsequences to replace existing Subsequences. However if the setup has advanced to the point where the problematic Subsequence is part of a Supersequence, with equipment and dumps assigned, then any new replacement Subsequence will require all of this set up to be done afresh. The process of editing Subsequences effectively allows the contents of an existing Subsequence to be replaced with new contents, and the Subsequence automatically renamed according to the naming rule. Any pre-existing equipment or dump assignments will apply to the modified Subsequence, and it will appear in any Supersequence where the original was located.
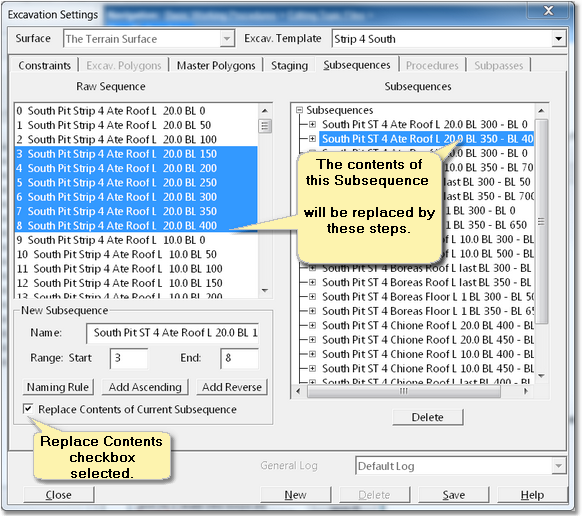
The procedure for modifying an existing Subsequence is very similar to the process of creating a Subsequence. On the Subsequences page of the Excavation Template the desired Steps are selected from the Raw Sequence in the usual manner. In the Subsequences list the Subsequence which is to be modified is selected:

Editing Subsequences
The checkbox Replace Contents of selected Subsequence is checked, and either the Add Ascending or Add Descending button is clicked. The the contents and name of the selected Subsequence are replaced. It appears that the selected Subsequence has simply been replaced by the new Subsequence, but internally the system will apply any assignments (equipment or dumps), and the new Subsequence will appear in all Supersequences replacing the original.
Tip – Editing Subsequences
 When a Subsequence is modified it is important to test to ensure that it has the desired characteristics. Frequently two adjacent Subsequences will be modified at their common block boundary, and it is important to ensure that the change has created no gaps or overlap. Running a full Simulation can be a time-consuming way to test. Use the Excavate/Start Supersequence to run just the excavate side of the process. If the display of Surface Features and other unnecessary elements are switched off in the Terrain Window, this process will run very quickly.
The above examples involve creating a Subsequence for a single Strip where the Strip designed is the next Strip to be excavated. Frequently a design task will involve modelling several sequential Strips. The procedure for modelling several strips or pits in parallel involves creating an Excavation Template for each pit/strip and setting up the appropriate Subsequences. Once the Subsequences exist these can be assembled in series or parallel in the Supersequence which controls the simulation.
Recommended procedures for handling multi-strip designs are covered in the section Creating Supersequences and the subsection Supersequences Spanning Pits.