|
<< Click to Display Table of Contents >> Creating Subsequences |
  
|
|
<< Click to Display Table of Contents >> Creating Subsequences |
|
A Subsequence consists of a set of contiguous Steps. A Subsequence is typically a group of steps from the one Lift of the one Pass. However Subsequences can span lifts and passes.
It is very important to get a clear idea of the functioning of Subsequences, as they are critical to efficient and effective simulation. Any group of contiguous Steps can form a Subsequence. However Subsequences must be carefully assembled to ensure that the desired simulation can be achieved.
The following characteristics and functioning apply to Subsequences:
•The excavation of Subsequences consists of the excavation of the Steps which make up the Subsequence. The steps are excavated one at a time, in order. The order of excavation of steps is determined by the user when the Subsequence is first assembled.
•Automated dumping is achieved by assigning dumps, or a dump hierarchy (list of dumps in order of priority), to Subsequences. As each Step of a Subsequence is excavated material reports immediately to the assigned dump hierarchy.
•Haul routes, including excavation and dump access ramps, are assigned to Subsequences.
•Equipment fleets are assigned to Subsequences.
For most projects any Subsequence created will ultimately be used in a Supersequence which is part of the Truck and Shovel Simulation. When creating Subsequences for such purposes the following points need to be considered:
•All Blocks in a Subsequence will have a common Dump Hierarchy. That is to say all Blocks will report to the same Dumps. Subsequences cannot be subdivided for dumping purposes. However, when two or more Dumps are applied as a Dump Hierarchy, all material from the Subsequence reports initially to the first Dump, when this is full all remaining material continues reporting to the second Dump and this process continues throughout the Dump Hierarchy.
•All blocks in a Subsequence share a common Road assignment for each dump in the Dump Hierarchy. In order to simulate productivity, 3d-DigPlus uses a system of roads to connect Excavation and Dump. For each Dump in the Hierarchy a unique system of roads is assigned. Subsequences cannot be subdivided for the purpose of road assignment, all blocks in a Subsequence will report to the same dump by the same road system.
•All blocks in a Subsequence will have the same Excavator fleet assigned. In order to simulate productivity 3d-DigPlus must use an equipment fleet to simulate transport from excavation to dump. Excavator fleets are applied to Subsequences, therefore all blocks in the Subsequence will use the same Excavator fleet. Subsequences cannot be subdivided for the purpose of Excavator assignment.
•All blocks in a Subsequence will have the same Truck fleet assigned for a given Dump. Truck fleets are applied to Subsequences. The Truck fleet can either be applied for all Dumps in the Subsequences' Dump Hierarchy, or each Dump can have an individual fleet assigned. However Subsequences cannot be subdivided for the purpose of Truck assignment apart from the subdivision between Dumps.
For the above functions, Subsequences cannot be subdivided. So if a particular equipment fleet is assigned to a Subsequence all blocks in the Subsequence will be excavated with the fleet. The total excavation must be assembled into Subsequences such that all the desired equipment allocation, haul routes, and dump allocations can be achieved with those Subsequences.
Subsequences are assembled on the Subsequences page of the Excavation Settings dialog box. The procedure for creating Subsequences is as follows:
•Set up the Naming Rule (see below).
•In the Raw Sequence list locate the step at the start of the desired Subsequence. Point to this step and left click to select.
•Locate the step at the end of the desired Subsequence (scroll down if required), shift click to select the group of steps between the first and the last step.
•The Steps are now ready for inclusion in a Subsequence. The Subsequence is formed by clicking either the Add Ascending or Add Reverse buttons. Add Ascending creates a Subsequence with steps in ascending order, Add Reverse creates a Subsequence starting at the highest numbered step and following in descending order.
When a new Subsequence is added it is given a name, this name is determined by a naming rule. Clicking on the Naming Rule button opens up the Naming Rule dialog box. The various fields applied to each Step are available via the Naming Rule to be applied to the name of Subsequences.
The Naming Rule dialog box is shown below:
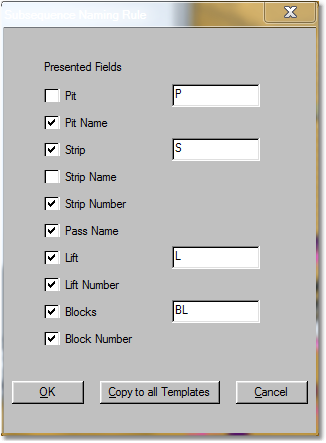
Down the left-hand side of the dialog box is a column of checkboxes which allow various naming fields to be selected. Some components of the name such as the shorthand to refer to pit and strip can be controlled by the user. As the resultant Subsequence name will be used in Supersequences lists, where space is limited it is important to keep the naming as brief as possible while still conveying all necessary information in a legible form. When the naming rule is established dialog box can be terminated by either clicking OK or copy to all templates. Generally once a Naming Rule is set up will want it to apply to all templates so generally the correct responses to click Copy to all Templates.
This Naming Rule creates a name where the left-hand part of the name describes the pit, strip, pass and lift and the right-hand part gives the starting block number and ending block number. As the resultant name has only one descriptor for strip/pass/lift this rule is only suitable for Subsequences formed from the one pass/lift. The vast bulk of Subsequences used in practice will conform to this requirement.
Important Information – Limits of Naming Rules.
 The Naming Rule system is designed to name Subsequences consisting of a series of Steps (Blocks) which are contiguous and share a common Pass/Lift. It is possible to select a group of Steps which span Lifts and even Passes, however the naming rule will not auto generate legible names in such cases. If you see a Subsequence, with an auto generated name, where the name includes reference to two lifts, or some other anomaly, it is most likely that the Subsequence spans Lifts or Passes.
Subsequences can be created with a more ad hoc form, however the ad hoc nature of such Subsequences makes it impossible to name them by rule. If you require such Subsequences they can be manually named by keying in the desired name in the name field. The use of such Subsequences is not recommended as it will tend to create an illegible Supersequence.
If you create a raw sequence using numerous lifts, but wish to initially create a simple Supersequence which only excavates passes, you can create Subsequences for the final lift only of each pass. When the final lift Subsequence is excavated it will excavate out all material above it including material that would normally be excavated by the upper lifts.
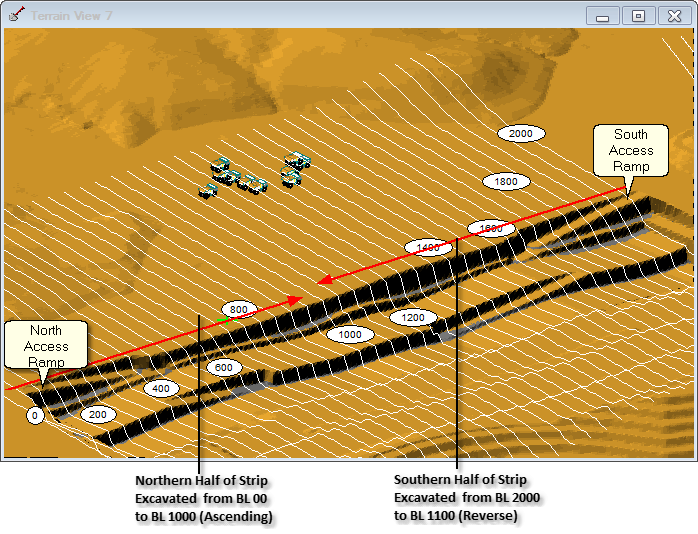
The process of assembling Subsequences will now be demonstrated with the pit shown in the video clip at the start of this section (see creating Raw Sequences). This is a long strip running in a north-south direction, from block 0.0 to block 2000. There is an access ramp at the northern end and another at the southern end. The strip will be excavated from North (block 0.0) to the centre of the strip (block 1000) and also from the South (block 2000) back to the centre (block 1100):
There are two methods of creating Subsequences:
•Manual assembly of Subsequences. With this method the user manually selects a group of Steps in the Raw Sequence and creates a Subsequence from this selected group.
•Auto generation of Subsequences. Auto Generate is a function that allows the user to define a set of rules from which a series of Subsequences are created from a Raw Sequence.
The following video clip shows the manual method of creation of Subsequences. In order to demonstrate the way we apply different auto generate rules to different passes, We will create waste Subsequences, as described above. However we will create 2 Subsequences for coal, with each Subsequence starting at the centre of the strip and excavating towards the endwalls:
The following video clips illustrate the auto generate method of creating Subsequences.
Key Information-Mining Through a Seam.

The above procedure for creating a Staged Excavation will create a Step for every block/pass/lift in the excavation. Typically all of the steps will be included in a Subsequence and will be individually excavated. However there is no requirement for all steps to be excavated. If a particular step or group of steps in a particular horizon are not excavated, when the horizon below is excavated material remaining above will all be excavated and will report to the material log associated with the lower horizon steps via which the excavation is performed.
A common application for this is the situation where a coal seam is continuous for entire strip but is only worth mining for part of the strip. Consider as an example strip running from block 0.00 to block 2000, with mid horizon seam called Seam B. Seam B is only viable between blocks 0.0 and block 1000. A Subsequence will be created to remove the waste above Seam B, and another Subsequence will be created to remove Seam B coal from block 0.0 to block 1000. Seam B coal will be left in place from block 1100 to block 2000 . When these Subsequences, and those for the horizons below, are included in a Supersequence the following will be the result:
•Seam B coal will be uncovered for the full length of the strip.
•Seam B coal will be excavated between blocks 0.0 and block 1000, this material will report to the assigned coal material log.
•When the horizon below Seam B is mined coal sitting on top of this horizon in blocks 1100 to block 2000 will be excavated with this horizons' waste and report to the assigned waste log.
Key Information – Pits with Steep Dipping Seams.
 The description and example above applies to a pit with a moderately dipping seam. In such cases each pass, waste and coal, is excavated complete prior to excavating the complete following pass. For pit which mines seams which are very steeply dipping it is often the case that multiple seams may be exposed at any given bench level. In such cases multiple passes of waste and coal are excavated with a single bench. 3d-DigPlus has advanced techniques for handling such pits, see topic Creating Subsequences for a Pit with Steep Dip.