Creating Subsequences for a Pit with Steep Dip
As mentioned the the previous section, it is important to have a clear idea of how the pit will operate before creating Subsequences to model a particular operation. Some pits, such as pits with steeply dipping coal seams, require careful consideration of Subsequence structure. The following section demonstrates how to apply Subsequences to the excavation and mining of a steeply dipping coal seam. This example gives an insight into how mining requirements affect the structure of Subsequences.
There are two methods of creating Subsequences for a pit with steeply dipping coal:
1.Manual assembly of Subsequences for each Pass that each Lift.
2.Generation of Lift Sorted Raw Sequence followed by Auto generation of Subsequences.
Generally method 2 is the superior and quicker method, both methods are explained below.
Method 1 Manual assembly of Subsequences
The design of Subsequences to model the steeply dipping pit is demonstrated here via the use of an example pit. This example pit has one coal seam, the Chione seam.
The figures below show the pit used for this example:
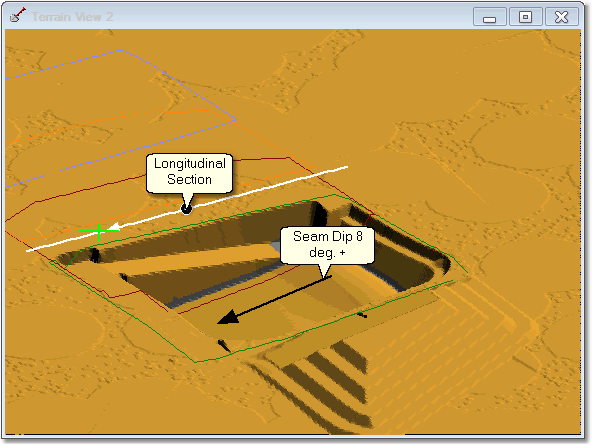
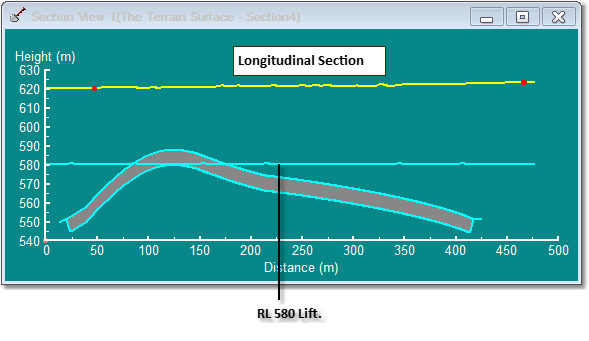
The staged excavation for the strip will use two passes, one for the waste to the coal seam roof and the other for coal mining. Both passes will use 10 meter lifts, with the lift set up so that the two passes share common lift levels. An example lift, at 580 RL, is shown in the longitudinal section above. This lift will be mined by excavating the waste to RL 580 and exposing the coal which peaks above this level. Then mining the coal is in the Subsequence for the coal pass 580 RL lift.
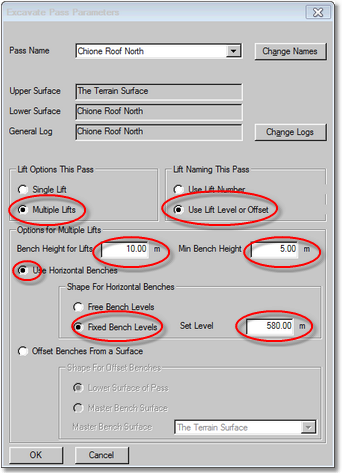
The staged excavation for this strip is set up using the procedures described in the previous section. The set up which is particular to the requirements of the steep dip are the Pass Parameters, in particular the Lift Options. The waste and coal passes each had to be set up to use a common set of lifts. In this example we use the option Horizontal Benches with the sub option Fixed Bench Levels. Using this setup for both passes, and applying a common Set Level for both passes ensures that the two passes will have common lifts. The Set Level parameter is a level which is used for the basis for setting lift levels, all lifts will be located at this level with an offset which is a multiple of the Bench Height for Lifts.
In this example the Set Level is set to 580 and the Bench Height the Lifts is 10 m. So lifts will potentially be located at levels 580, 590, 600 etc. Although we are using the Horizontal Benches option in this example we could have used the Offset Benches from a Surface option in a similar manner to produce common benchesf or both passes.
The figure below shows the pass parameters for the waste pass, the coal pass parameters are the same:
The following video clip shows the creation of the Raw Sequence:
The following figure shows the resultant Raw Sequence:
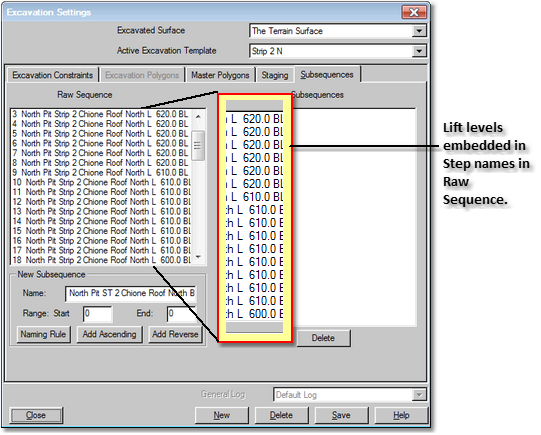
Note that the names of raw sequence steps include the lift levels for each Lift. Subsequences must be created which allow the mining process to be properly simulated. The video clip above for the Raw Sequence creation shows at the 180 bench level that the waste pass uncovers several blocks of coal for about block line 300 onwards. The mining sequence for the 180 bench will involve removing waste and uncovering the coal, then removing the coal down to the 180 level where it exists on this bench. To do this the following Subsequences are required:
•A waste pass Subsequence for the full 180 lift.
•A coal pass Subsequence for those parts of the 180 lift where coal exists.
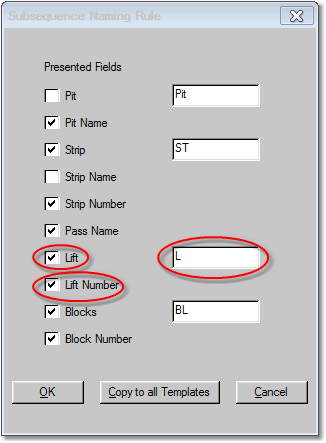
These Subsequences are a formed by noting the lifts associated with each step. Before creating the Subsequences it's important to make sure that the Naming Rule is set up to name the Subsequences with lift information:
For this strip waste and coal are excavated from low block to high block. The process for creating Subsequences is as follows:
•Create a contiguous sub sequence for all blocks for each lift of waste passes.
•For each lift level if coal exists at that level create a Subsequence covering the blocks in which the coal exists at that lift.
The following video clip shows the creation of Subsequences for the 180 RL lift:
Once suitable Subsequences have been created they can be formed into a Supersequence and the operation simulated. The creation of Supersequence is is covered elsewhere in this documentation. The video below shows the execution of a Supersequence for the above operation:
Method 2 Lift Sorted Raw Sequence followed by Auto Generation of Subsequences.
When the Raw Sequence is generated for a typical Pit the Raw Sequence steps are sorted by lift/pass from top to bottom. All Blocks for the first lift of the first pass our excavated followed by all Blocks for the second lift of the first pass etc.
Raw Sequences may also be sorted by lift. In order to use this option Multiple Lifts must be selected in the Pass Parameters along with the following Bench Parameters:
•Horizontal Benches
•Fixed Bench Levels

Bench Parameters for Steep Dip Excavation.
The following figures illustrate the example pit which is used to illustrate this method of modelling a pit with steep dip. It is similar to the example above however has more coal seams which have greater dip.

Multi-Seam Steep Dip Example Pit.

Multi-Seam Steep Dip Example Pit - Longitudinal Section.
As can be seen in the figures above, at each bench level three coal seams and three waste passes are encountered. In this example the default bench height for lifts is 10 m.
The Staged Excavation is set up in the usual manner with all coal seam roof and floors selected to define the Passes, The option Sort by Lift is selected:

Multi-Seam Steep Dip Example – Pass Surfaces Set up.
Next the Set Pass Parameters button is selected. On the Pass Parameters page the Change Logs button is initially selected to attach or create all of the necessary Material Logs for each pass.
Next the Lift Options and Bench Options are selected as shown below. These options are set up for the first Pass and then the Set All button is selected. The Set All button will copy these parameters to all other Passes. Note that it is only the Lift Options and Bench Options which are copied to all passes:

Multi-Seam Steep Dip Example – Pass Parameters.
When the setup is complete and the Create Raw Sequence button is selected, a Raw Sequence is created which is sorted by Lift/Pass. The Steps for the highest lift are at the top of the Raw Sequence, within this lift Steps are sorted by Pass and Block. The first group of Steps in the list are for the highest Lift. The first Step in this group is for the lowest numbered block of the highest Pass. The figure below illustrates a Raw Sequence sorted by Lift, note that Steps associated with three Passes can be seen in this segment of the Raw Sequence and they are all for the highest numbered (620 RL) Lift:

Multi-Seam Steep Dip Example – Lift Sorted Raw Sequence
Once we have a Lift Sorted Raw Sequence we can create the subsequences either manually or by Auto Generate.
The following video clip illustrates the process of setting up a Excavation Template and Supersequence for a pit with steep dip: