|
<< Click to Display Table of Contents >> Creating Subsequences for Strip 4 |
  
|
|
<< Click to Display Table of Contents >> Creating Subsequences for Strip 4 |
  
|
With the Excavation Template and Raw Sequence complete for Strip 4 we are ready to create the Subsequences . The strip will be excavated in two halves, the northern half and the southern half.
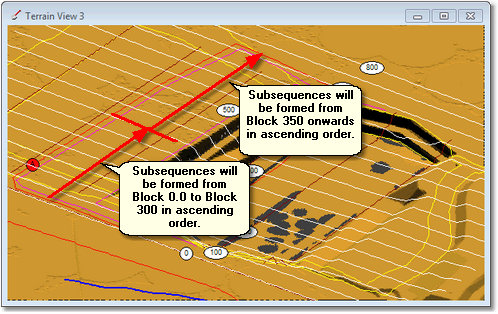
For the Ate Roof and Floor Passes, the northern half, extending from Blocks 0.0 to 300, will be excavated in lifts starting at the northern end and working to the centre. This will require Subsequences which go from Block 0.0 to Block 300 in ascending order. The Ate southern half will require Subsequences which start at block 350 and extend to block 700in ascending order. The coal will be excavated in a similar sequence but with a single lift.
The figure below illustrates this:

Strip 4 Ate Pass.
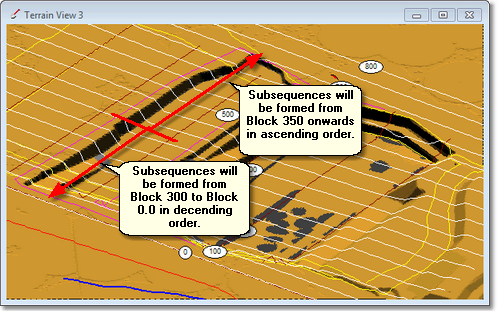
For the Boreas Roof and Floor Passes, the northern half, extending from Blocks 0.0 to 300, will be excavated in lifts starting at the centre end and working to the centre. This will require Subsequences which go from Block 300 to Block 0.0 in decending order. The Boreas southern half will require Subsequences which start at block 350 and extend to block 700in ascending order. The coal will be excavated in a similar sequence but with a single lift.
The figure below illustrates this:

Strip 4 Boreas Pass.
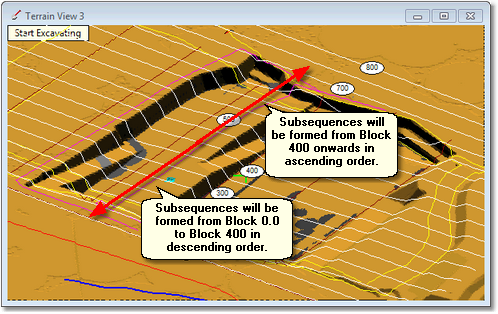
For the Chione Roof and Floor Passes, the northern half, extending from Blocks 0.0 to 400, will be excavated in lifts starting at the centre end and working to the centre. This will require Subsequences which go from Block 400 to Block 0.0 in decending order. The Chione southern half will require Subsequences which start at block 450 and extend to block 700in ascending order. The coal will be excavated in a similar sequence but with a single lift.
The figure below illustrates this:

Strip 4 Chione Pass.
The following video demonstrates the procedure for Strip 4.
3d-DigPlus must be in Auto mode after the tutorial file is loaded:

Simulation Pulldown - Auto Mode
Load the File Topic5_Complete, when the exercise is complete save the 3d-DigPlus file under the name: Topic6_Complete.3dd
Save the 3dd file as:
Topic6_Complete.3dd