|
<< Click to Display Table of Contents >> Assigning Dumps to Subsequences for Strips 3 & 4. |
  
|
|
<< Click to Display Table of Contents >> Assigning Dumps to Subsequences for Strips 3 & 4. |
  
|
At this stage our 3d-Dig file contains a Supersequence for Strips 3 & 4 and three dumps to accommodate the waste from the excavation of this Supersequence. In this exercise dumps will be assigned to the Subsequences involved and the Supersequence will be run to test the dumping strategy.
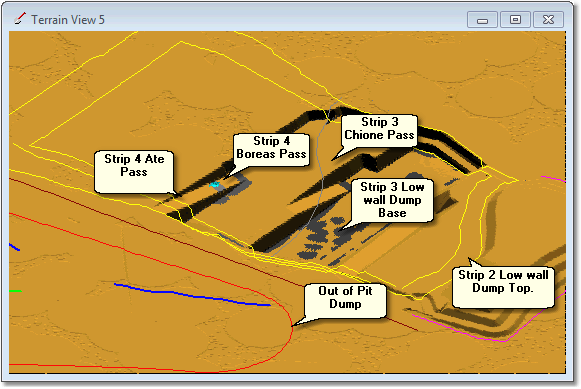
The layout of the Strips and Dumps is shown in figure the below:

Layout of Excavation Passes and Dumps for Strips 3 & 4.
The waste for Strip 4 Ate and Boreas passes will report to the same Dump Hierarchy. The first Dump in this Hierarchy is the Strip 2 Low wall Dump Top. As this dump is unlikely to accommodate all the waste produced by these passes, the Hierarchy also includes the Out of Pit Dump. As the Strip 4 Ate and Boreas passes are excavated material will initially report to the Strip 2 Low wall Dump Top, if and when this dump becomes full the balance of waste will report to the Out of Pit Dump. The Out of Pit Dump is very large and will be able to accommodate all excess waste.
The waste for Strip 3 Chione pass will report to the Strip 3 Low wall Dump Base. This particular dump is built on the currently empty Strip 2 void, and extends to the full height of the low wall dump design surface. Consequently this Dump contains a very large volume and we can be confident the Strip 3 Chione waste will only consume portion of its volume.
This topic involves the following tasks:
1.Open the Assign Dump Templates dialog. This dialog allows Subsequences to be selected and have a Dump Hierarchy assigned.
2.Select the Excavation Template for South Pit Strip 4, select all Waste Subsequences for the Ate and Boreas Passes.
3.For the selected Ate and Boreas Waste Subsequences assign the Dump Hierarchy: Strip 2 Low wall Dump Top - Out of Pit Dump.
4.Select the Excavation Template for South Pit Strip 3, Select the waste Subsequences for the Chione Pass.
5.For the selected Chione waste Subsequences assign the Dump Hierarchy: Strip 3 Low wall Dump Base.
6.When the Dump Assignment is complete, from the main menu select the command Simulate/Run Supersequence. This will run the Supersequence, as each block is excavated its material will automatically report to the assigned dump. We want to observe the result and ensure that the correct dumps have been assigned and that they have adequate spoil room to accommodate all waste.
7.On completion of the Supersequence run will use the Restore point to restore the topography and material logs to the starting state.
3d-DigPlus must be in Auto mode after the tutorial file is loaded:

Simulation Pulldown - Auto Mode
The following video clip illustrates the steps involved in this exercise:
Load the File Topic10_Complete, when the exercise is complete save the 3d-DigPlus file under the name: Topic11_Complete.3dd.
Save the file a second time under the name: Topic12_Start.3dd, For use in the upcoming topic Short Term Truck and Shovel Simulation.
Save the 3d-Dig file as:
Topic11_Complete.3dd