|
<< Click to Display Table of Contents >> Creating Subsequences for Strip 3 |
  
|
|
<< Click to Display Table of Contents >> Creating Subsequences for Strip 3 |
  
|
With the Excavation Template and Raw Sequence complete for Strip 3 we are ready to create the Subsequences for Strip 3 Chione pass. The strip will be excavated in two halves, the northern half and the southern half.
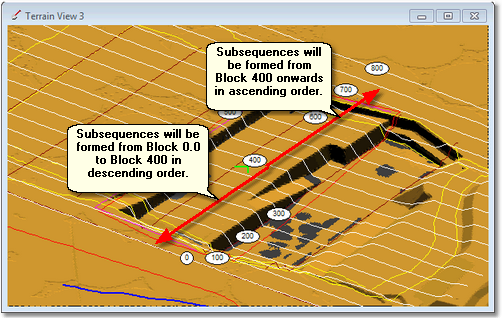
The northern half, which extends from Blocks 0.0 to 400, will be excavated in lifts starting in the middle of the strip at Block 400 and working north to the northern end. This will require Subsequences which go from Block 400 in descending order to Block 0.0.
The southern half, which extends from block 450 to block 700, will be excavated in lifts starting at the centre of the strip and progressing south. This will require Subsequences which go from block 450 in ascending order to block 700.
The Chione coal will be excavated as a single lift subdivided into Subsequences as per the waste passes.
Key Information - Relationship between Pit Block Lines and endmost Blocks in Raw Sequence
 Note that when creating the raw sequence 3d-DigPlus determines the final Block at the end wall based on where the last block containing excavated material is located. It is typically the case that the Strip Block Lines will extend beyond the Pit end wall. As a consequence there are often some Pit Blocks beyond the end wall which contain no excavated material, these Blocks do not appear in the Raw Sequence. So the terminal Block appearing in the Raw Sequence is often not the end most Block of the pit.
The figure below illustrates Strip 3 Chione pass:

Strip 3 Chione pass.
The Supersequence will excavate the first waste lift of the northern half of the Pit, followed by the first waste lift of the southern half. excavation will continue in this order until the northern half coal is exposed, at which point the northern half coal will be removed. Finally the last waste pass of the southern half will be excavated followed by the coal for the southern half.
Before creating the Subsequences we will need to establish the Subsequence naming rule which will control the names 3d-DigPlus generates automatically for the Subsequences. When creating and naming Subsequences is important to think ahead and consider the future development of the 3d-DigPlus model. This will determine how much information the name of each Subsequence must contain. If the simulation is for a very simple short-term model can find only to one Strip of one Pit then information such as Strip name and Pit name may be irrelevant. In the case of this model it will at the very least cover two Strips, Strip 3 and Strip 4. It is therefore essential to have the Strip name incorporated in the Subsequence name. This will allow the strip to which each Subsequence belongs to be clearly legible when the Supersequence is formed.
This particular exercise is confined to one Pit (South Pit), however the 3d-DigPlus file does incorporate information for a second Pit (North Pit). The setup been conducted here may be used in future as part of a combined simulation incorporating both South and North Pits. We will therefore incorporate the Pit name in the Subsequence.
The steps required to perform the tasks in this topic are:
1.Open the Excavation Settings dialog and select the Subsequences page.
2.On the Subsequences page click on the Naming Rule button. This will open the Naming Rule dialog. As the Subsequences are created 3d-DigPlus automatically creates a name for each Subsequence. The Naming Rule dialog allows the user to establish a set of rules which control this automatic name generation.
3.Using the Raw Sequence list and the appropriate buttons Raw Sequence Steps are selected and used to create the required Subsequences.
The following video clip demonstrates the procedure to set up of Subsequences for Strip 3:
3d-DigPlus must be in Auto mode after the tutorial file is loaded:

Simulation Pulldown - Auto Mode
Load the File Topic2_Complete, when the exercise is complete save the 3d-DigPlus file under the name: Topic3_Complete.3dd
Save the 3dd file as:
Topic3_Complete.3dd
Creating Raw Sequences & Subsequences