|
<< Click to Display Table of Contents >> Material Logging |
  
|
|
<< Click to Display Table of Contents >> Material Logging |
  
|
Modelling of mining processes frequently involves many excavation, transport and dumping processes. Typically, these processes will be performed by a variety of equipment fleets and frequently a variety of different overburden and ore materials will be involved. For example a coal mining operation may be conducted by a truck and shovel pre-strip fleet, a dragline stripping operation and a truck and shovel coal-mining system.
It is important to comprehensively record the material statistics associated with these processes. In 3d-DigPlus, this is referred to as material logging. 3d-DigPlus has a built-in material database called the material information log that serves this purpose.
To have a complete understanding of material logging you must understand how material logging relates to the excavation, dumping and simulation processes. Each of the chapters on these processes has a section explaining how the process links in with material logging.
The concept of Rehandle material is critical to material logging. You should be familiar with the way in which 3d-DigPlus determines and calculates rehandle before continuing with this section on Material Logging. 3d-DigPlus's methodology for determining Rehandle is explained in the topic Prime Surface and Rehandle.
3d-Digs material logging system has been designed to meet the following objectives:
•Record the total material excavated the total material dumped and any discrepancy.
•Record the excavated total prime (in situ) and rehandle (previously handled material)
•The material excavated by each equipment fleet (total material and prime/rehandle).
•The total material of each defined type (geological horizon) excavated and dumped.
The logging system works in conjunction with the excavation and dumping systems to take account of material swell and allow for pre-swelled rehandle material.
To achieve the above objectives 3d-Dig’s Logged Information database contains three parallel material logging systems:
•General Log. The General log records the total material excavated and dumped.
•Machine Log. The Machine Log records the material handled by a particular equipment fleet. when note that this is only applicable when one of the machine simulation modes are selected. This requires registration of the appropriate 3d-DigPlus Module.
•Layer Log. The layer log records the total material of a particular type (as defined by a geological interval). Layer Logging is set up in the Layers interface. Layer Logging was established in early version of 3d-DigPlus and has now largely been superseded by the systems available in Automated Excavation and Dump sequencing. Layer Logging is established with settings in the Layers dialog.
Each of these logging systems appears as a separate page in the Logged Information database. Each of these pages contains the individual logs. The logs are individually created by the user as required. For example the Machine Log page may contain machine logs for the “pre-strip fleet”, ”dragline 1” and the “Coal Fleet”. The Layer Log page may contain logs for” Tertiary clay”,” Mid-burden” and “Clay.”
When an excavation is performed its volumes (Prime and Rehandle) report to the associated General Log. This material can further be subdivided according to pit Block Lines. This is explained in the topic
In order to manage the complex volumetric data of mining simulation it is recommended that before starting a job you consider all the processes to be modelled and create a set of suitably named logs.
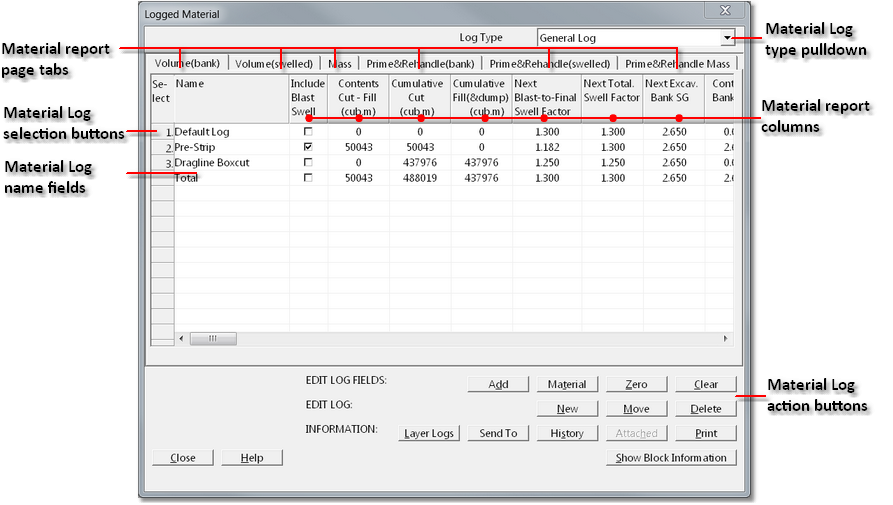
The following figure shows the Logged Material dialog:

Logged Material dialog.
In the top right corner is the Log Type pull-down list. This pull-down list allows selection of General Log, Machine Log or Layer Log. All of the information that appears in the Logged Material dialog box applies to the log type selected in this pull-down list.
The second column from the left is the main column of the material log. This column contains the list of all currently existing logs of the selected type. When you create a new material log, it appears in this column.
The remaining columns display the material quantities. This information is distributed over several pages accessed via page tabs. At the top of each column is a title that describes the quantities displayed in that column. Generally, these follow standard mining terminology. Terminology specific to 3d-DigPlus is described below.
When material is excavated, it is added to the Contents of the material log. Hence, the Contents are material that has been excavated but not dumped. When excavated material is dumped, it is taken from the contents and hence the contents reduce.
For example, if 100000 BCM is excavated and recorded in the Pre- strip log. The Pre-strip log Contents will appears as 100000 BCM. If material is subsequently dumped from the Pre-strip log this material will come from the Pre-strip log’s Contents. Hence the Pre-strip log’s Contents will reduce. When all the material is dumped, the pre-strip logs Contents will be zero.
Thus, the Contents represent an imbalance i.e. material that has been excavated but not dumped.
The Cumulative Cut is the total of all excavated material associated with the log. It is affected only by the excavation process and independent of dumping. A positive value indicates excavated material.
The Cumulative Fill is the total of all dumped material associated with that log. It is affected only by the dumping process and independent of excavation. A positive value indicates dumped material.
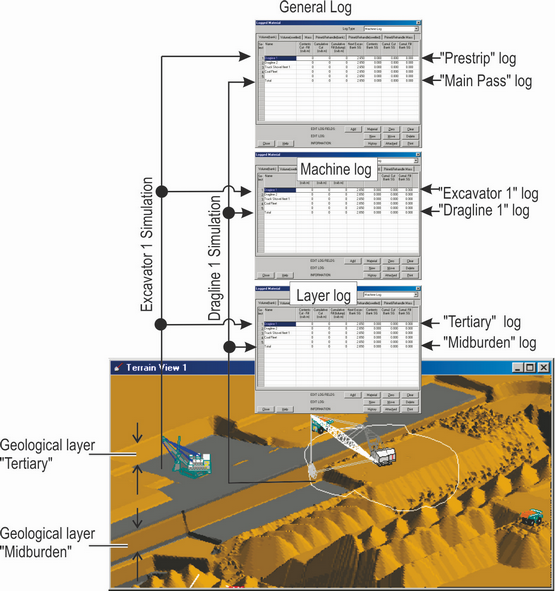
The following figure is a schematic diagram illustrating how the material logs record two simulation operations:
Excavator 1 (and associated trucks) excavates and dumps a block of pre-strip material. This material is excavated from a stratum called “Tertiary”. It uses a General Log called “Pre-strip”.
Dragline 1 excavates and dumps a block of material. This material is excavated from a stratum called ”Midburden”. It uses a General Log called “Dragline”.

Material Logging.
It should be noted that in the example in Figure 53, for each simulation, the volume of material reporting to each log is identical (i.e. the same volume reports to the Layer log as to the Logged Material). This is so because each piece of equipment excavates only one geological layer. However, in general this condition is not necessarily true. A piece of equipment can excavate multiple layers in one excavation or relocate from one pass to another (involving different strata). In all cases 3d-DigPlus will distribute material correctly to the various logs.
At the bottom right hand corner of the Logged Material dialog box are a set of action buttons. These buttons allow the material properties and log contents to be edited.
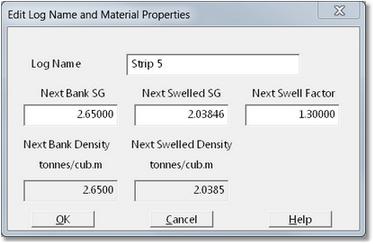
To create a new log use Material | Logged Information to open the Material Log dialog box. Click on the New button in the right-bottom corner. The New Log dialog box will appear:

New Log dialog.
In the Log Name field the name of the new Material Log is keyed in. The remaining fields in the New Log dialog allow the user to set the material properties. This includes swell factor and density. The density is only critical the material log is used as part of a simulation. In such cases density effects equipment fleet productivity. When the appropriate parameters are input clicking the OK button will create the log.
Note that the names of the density and swell fields are preceded with the "Next" . It is possible to change the material properties retrospectively. Consequently the swell factor which appears in the Material Log is that which applies when the next excavation with this log is executed.
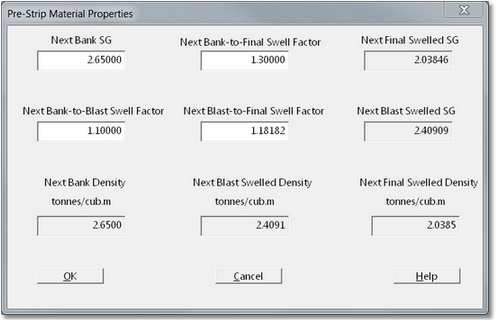
3d-DigPlus Material Logging has the facility to account for blast swell. If a particular log requires the blast swell factor this is added after creating the log with the full swell factor specified. the Material Log General Logged page includes a column of checkboxes titled Include Blast Swell. There is one checkbox for every Material Log. Selecting the Include Blast Swell checkbox for a particular Material Log and will produce the Material Properties dialog for that log:

Material Properties dialog.
With Include Blast Swell selected the following additional swell factor is are required:
•Bank to Blast swell factor. This is the swell factor of material from bank in situ to blast muckpile.
•Blast to Final swell factor. This is the swell factor of material from blast muckpile to final spoil.
•Bank to Final swell factor. This is the total swell factor from bank in situ to final spoil pile.
The Bank to Final (total) swell factor is the governing swell which determines total swell from bank in situ to final spoil. The above blast related swell factors are adjusted automatically to ensure the correct total swell.
 Warning - Blast Swell Factor and Blast Gain.
Where material is blasted the muckpile will commonly extend into the final spoil pile. Material cast to final spoil by the blast is referred to as blast gain. In order to achieve the correct Total Swell Factor the blast gain is assumed to be fully swelled. The existence of blast gain significantly increases the complexity of swell factor calculation, and is not automatically accounted for when Include Blast Swell is selected for a Material Log. 3d-DigPlus' Blast Wizard function automatically determines blast gain for simulated blast, and creates material logs with appropriate swells. the Blast Wizard topic in this documentation explains the concept of blast swell and blast gain. It is recommended that the Blast Wizard topic be studied before manually implementing blast swell. If it is required that Blast caps will be used for a blast profile which is included in the topography, the user will have to estimate or calculate blast gain and adjust to swell factor is to account for this.
Modifying Material Logs
The action buttons at the bottom right of the Material Log dialog allow the properties of pre-existing Material Log is to be modified. Buttons available are:
Add. This button brings up a dialog which allows material to be added to a nominated Material Log.
Material. This button brings up the Material Properties dialog described above. It allows material properties to be modified.
Zero. The Zero button will negate various quantities in a nominated Material Log.
Clear. The Clear button will clear all quantities in a nominated Material Log.
New. The New button creates a new Material Log.
Move. Material Logs can be moved up and down in the list using the Moved button.
Delete. The Delete button deletes a nominated Material Log.
Layer Logs. The Layer Logs button opens up a window to any Layer Logs which have been established.
Send To. The Send To button allows data, Material Log to be exported to an Excel spreadsheet.
History. The History button opens up the window which shows the history all events which have contributed to the selected Material Log. Material Logs are selected by clicking on the adjacent Material Log select button (see figure above).