|
<< Click to Display Table of Contents >> Assigning Preset Productivities to Individual Dumps |
  
|
|
<< Click to Display Table of Contents >> Assigning Preset Productivities to Individual Dumps |
  
|
In the previous example we assigned Preset Productivities to Subsequences. In this situation whenever material is excavated with a particular Subsequence the Preset Productivity will be applied. Frequently Subsequences will have a hierarchy of several Dumps assigned. Some dumps will be significantly more distant or more elevated than others. In this situation it may not be appropriate to apply the same Preset Productivities to all Dumps.
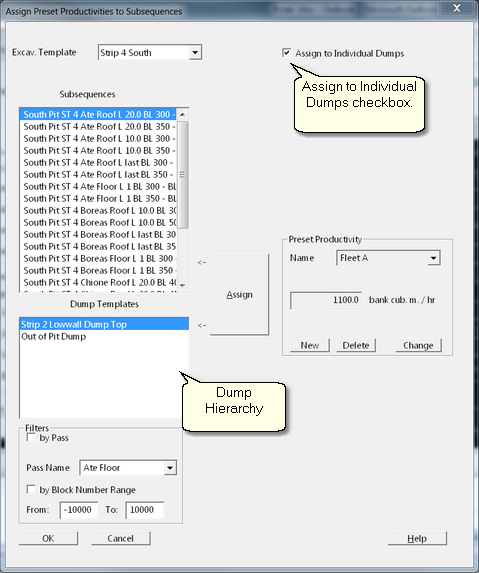
The Assign to Individual Dumps function allows a different Preset Productivity to be applied to each Dump. This task is performed in the Assign Preset Productivities dialog:

Assign Preset Productivities Dialog.
The procedure involves selecting the Assigned to Individual Dumps checkbox, then selecting the desired dump and applying the desired Preset Productivities. The tutorial exercise at the end of this topic demonstrates these procedures.
In the tutorial exercise which follows we have two Dumps in the hierarchy. In the case of both of these Dumps dumping commences at a reasonably modest elevation and substantial elevation is required to complete the top of the Dump. We wish to split these dumps vertically by elevation and assign a lower Preset Productivity to the upper portion of the dump. Hence we will implement a two-stage construction of these Dumps.
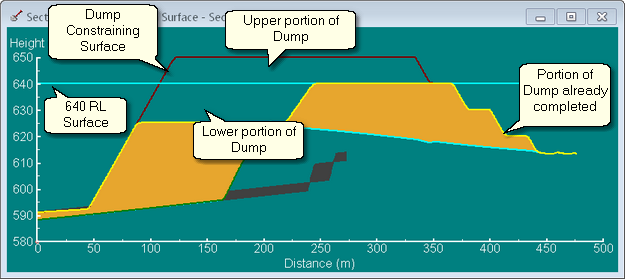
The following figure illustrates the Dump structure:

Cross Section through Typical Dump.
In the above figure that portion of the dump below 640 RL is the lower portion and the section above 640 RL is the upper portion.
To achieve this we will create two separate Dumps in 3d-DigPlus to model the same physical dump, one Dump for the lower portion and one for the higher portion. This situation, where we create two similar Dump structures to model the one physical dump, is referred to as Superimposed Dumps. Superimposed Dumps are always in the form of Staged Dumps. 3d-DigPlus makes the process of creating Superimposed Dumps easy by allowing you to create a new Dump which is an exact copy of the existing dump, including the Dump Area. Once this new Dump is created, it typically only involves changing one or two parameters to create the new Superimposed Dump.
In our example will will create a copy of two existing dumps which will be used to model the top portion of the Dumps. We will then impose the 640 RL Surface (see figure above) as a Constraining Surface to the original Dump. In this way the original dump will only take material for the lower portion which will have the lower Preset Productivity. Once this lower portion is full material will report to the Superimposed Dump which handles the upper portion. These procedures I demonstrated in the following tutorial video clip.
The following video clip tutorial demonstrates assigning Preset Productivities to individual Dumps and the use of Superimposed Dumps.
3d-DigPlus must be in Auto mode after the tutorial file is loaded:

Simulation Pulldown - Auto Mode
Load the file:
PresetProd_Indv_Dump_1.3dd