|
<< Click to Display Table of Contents >> Creating Raw Sequences |
  
|
|
<< Click to Display Table of Contents >> Creating Raw Sequences |
|
Simulation is ultimately controlled by the tree structure called a Supersequence. A Supersequence is like a schedule, it controls the sequencing and order of excavation.
Once the staging and pass parameters are set up, as described in the previous topics, the process of creating a Raw Sequence and Subsequences and ultimately a Supersequence can commence.
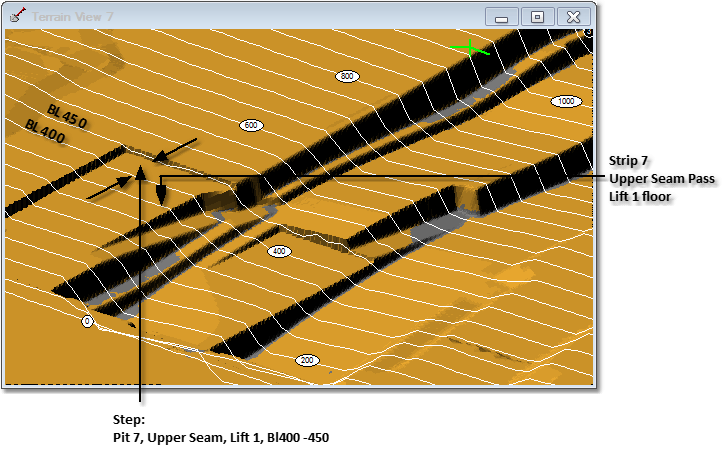
The smallest increment of an automated excavation is referred to as a Step. The planar extents of a Step are bounded by two adjacent blocks and by the Limiting Polygon. The vertical extents of a step extend from the floor of the lift or pass above to the floor of the current lift will pass to which the step belongs.
The following diagram illustrates a Step. Here lift 1 of the strip 7 upper seam pass has been excavated between blocks 0 and 450. The Step illustrated is the step between blocks 400 450.
A Raw Sequence consists of all Steps in excavation, starting at the lowest numbered block and the first lift of the first pass and continuing up the blocks and down the lifts and passes and concluding with the final block of the last lift of the final pass.
At the bottom of the Excavation Settings dialog box Staging page is that Create Raw Sequence button. When this button is clicked 3d-DigPlus creates the raw sequence, this process is displayed in the active terrain window where each Step is excavated and on completion of the process the original topography is restored.
The following video clip demonstrates the creation of a raw sequence. In this example the coal seam has significant undulation along strike, and the bench is horizontal, as a consequence the higher parts of the coal seam are uncovered before all the waste is stripped. Typically when creating an excavation template and a raw sequence all horizons mined from topography to floor of pit are typically included. For brevity in this example only the first two seams are processed:
Tip - Speed up Raw Sequence Creation.
 3d-DigPlus can perform the calculations associated with Raw Sequence creation very rapidly. However during the process the raw sequence itself is displayed in the active Terrain Window as the calculation progresses. This display can slow the process down somewhat. To minimise the slowdown open a Terrain Window which has the display of all design objects (Surface Features, Excavation Polygons,Block lines, Dumps ect) switched off. Having these items switched on will slow down the generation of raw sequences substantially. Using the Terrain/Fast Draw Settings to apply rarefied grid will speed up the window graphics and in turn speed up the generation of Raw Sequences.
Once the Raw Sequence creation process is complete the Raw Sequence will appear in the Raw Sequence list on the Subsequences page of the Excavation Template dialog box. The Raw Sequence for the above example is shown in the figure below:
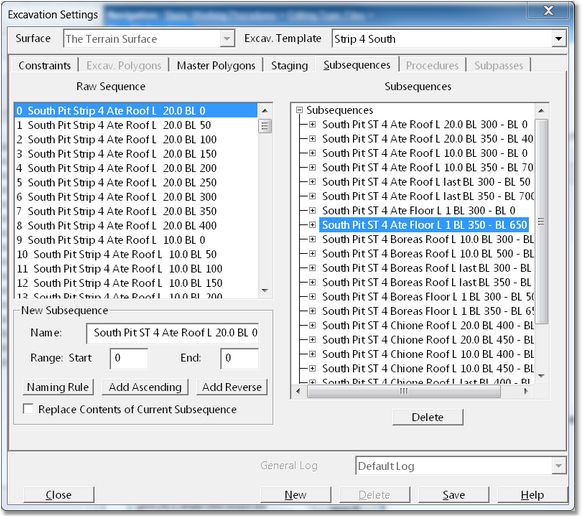
Each line in the Raw Sequence list represents a step. The information contained in each step descriptor consists of a series of fields. The fields are (from left to right):
•Step number. Each step has a unique number starting from zero and incrementing upwards.
•Pit. This is the name of the pit, as identified in the excavation template.
•Strip number. This is the strip number is defined in the excavation template.
•Pass. This is the name of the pass as defined in the staging set up.
•Lift. This is a descriptor identifying the specific lift to which the Step belongs. The form of the Step descriptor varies depending on the way in which the lifts have been defined. Where the lifts are based on levels the lift descriptor is the level of the current lift. Where the lifts are offset from the surface lift descriptor includes surface name and the offset of the current lift. There is also the option (in the Pass Parameters dialog box) to name the lifts by number, starting with one of the first lift.
•Block number. Each step begins and ends at sequential block lines. The block number is the number of the starting block line and is used to define the location of the step
Key Information
 Note that not all of the Blocks in the Block range for the Pit appear as Step entries for every lift/pass. Entries only exist for those blocks where excavated material exists. For example, if the pits Blocks start well before the first endwall, none of the block lines beyond the end wall will appear in the Step entries. As the lifts and passes progress down through the horizons the end wall batter will usually mean that the Steps for the lower passes will have a shorter block range than the passes above. If a coal seam exists only between say Block 0.0 and Block 500, the raw sequence will only include steps for these blocks and none will exist from Block 600 onwards.
Tip - Lift Naming.
 Although you have the option of naming lifts by number, it is generally best to use the option (default) to name the lifts by level or surface offset. When lifts are named in this manner the name denotes their absolute vertical location. This is important when simulating multiple strips with advance stripping. In such cases you may wish to excavate the current Strip to a particular bench then excavate the advance Strip to the same bench. When benches are named by level or offset it is easy to identify common with levels in different strips.