|
<< Click to Display Table of Contents >> Setting up the Pass Parameters |
  
|
|
<< Click to Display Table of Contents >> Setting up the Pass Parameters |
  
|
Clicking the pass parameters button on the staging page opens the pass parameters dialog:
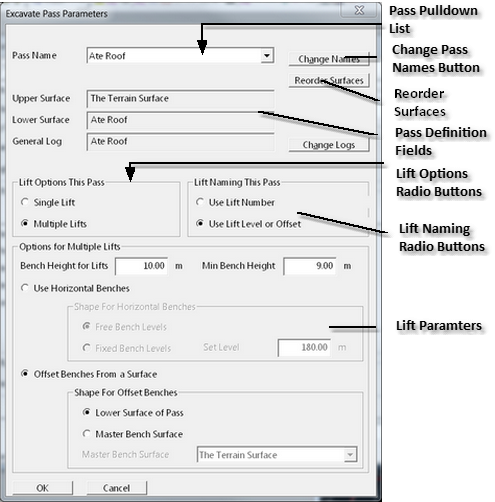
Excavate Pass Parameters Dialog.
The main elements on the past parameters dialog box are:
•Pass Pulldown list. This is a pulldown list which contains all of the passes associated with the current excavation template. They are formed automatically by 3d-DigPlus using the list of surfaces selected on the Staging page described in the previous section. When you select a particular pass from this drop-down list the upper surface, lower surface and associated material log are displayed in the Pass Definitions fields. When the past parameters dialog box is first opened you should check this pulldown list to ensure that all passes are listed and in the correct order. Each pass in an excavation can have its own pass parameters, and each pass must be set up individually.
•Change (pass) Names button. By default the Pass name automatically allocated is the name of the lower surface of the pass. These names can be overwritten using the Change Names button. However this is not recommended, see notes below.
•Reorder Surfaces. 3d-DigPlus checks the elevation of Pass Surfaces, in a zone within the Limiting Polygon, to establish the vertical order of Surfaces and Passes. This order can be modified via the Reorder Surfaces button.
 Warning - Surface Reordering
3d-Digs automatic surface ordering is generally very reliable. If this ordering appears incorrect, manual reordering should only be conducted after careful checking of surfaces. The most likely cause of incorrectly ordered surfaces is vertical overlap of surfaces.
•Pass Definitions Fields. This group of fields lists the upper surface, lower surface and General Material Log for the currently selected Pass.
•Change (pass) Logs button. When this button is clicked it opens the pass logs dialog box see notes in following section.
•Lift Options Radio Buttons. These buttons allow selection between Single Lift and Multiple Lift. With single lift all the material associated with a given pass is excavated in a single lift. When the Multiple Lift option is selected multiple passes can be set up to excavate the material in a given pass.
•Lift Naming Radio Buttons. These two radio buttons control the way in which Lifts will be named in the Raw Sequence and in Subsequences formed using this Raw Sequence. The option Use Lift Number, numbers the Lifts from top down. If there are say, lifts, the highest lift will be called Lift 1 and the lowest lift will be called Lift 4. When Use Lift Level or Offset is selected Lift name will reflect either the level of the Lift for horizontal bench Lifts, or in the case of Lifts which are offset from a surface, the name will be based on the offset height for the current Lift. See the Key Information note below.
•Lift Parameters. The lift parameters control the lifts which are used in the multiple lifts option. See following sections.
Key information - Pass definition in 3d-DigPlus and general mining Pass definition.
 The strict definition of the term Pass in mining does vary. The term Pass sometimes refers to the removal of a specific horizon (waste or coal in the case of a coal mine). However a strip which will uncover and mine three coal seams is often referred to as a three Pass operation. In this documentation, and in 3d-DigPlus functionality, Pass strictly refers to a specific horizon. However if the number of seams mined in a particular strip or pit is referred to it will be referred to as an 'n' coal Pass operation (e.g. a three coal Pass operation).
Key Information - Lift Naming Rules.

There are two options for the naming rules for Lifts. The option Use Lift Number is the simplest and gives each Lift an integer number starting with 1 at the top. This naming rule distinguishes the order of lifts within a single pass of a single strip, however it gives no indication of the absolute vertical location of the lift (e.g. RL).
Knowing the absolute location of the Lift is often important. For example if a particular Strip has been excavated to a particular Lift it may be necessary to advance excavate the following Strip to the same lift. Lift 'n' in one strip may not align with Lift 'n' in the following Strip.
The option Use Lift Level or Offset gives each lift and name which indicates its vertical location. This naming rule works differently depending on whether the Lift option Use Horizontal Benches or the option Offset Benches From a Surface is used. The rule works as follows:
•Use Horizontal Benches. When this Lift option is selected each bench is horizontal and located at a particular RL. The name of the lift incorporates the RL of the lift. Hence two lifts at the same RL but located in subsequent Strips will bear the same RL in their name and Lifts which align can be easily identified.
•Offset Benches From a Surface. When this Lift option is selected each Lift has the shape of a nominated Surface but is offset from this surface by distance. This offset distance is incorporated in the Lift name. Hence lifts which share the same Bench Surface and the same offset will align.
If there is any possibility of the need to align Lifts from different Excavations the naming option use lift level or offset should be used.
By default the Passes are automatically named taking the name of the lower Surface of the Pass. Material Logs are automatically created which also assume the name of the Pass with which they are associated. Passes and Logs can be manually named using the Change Names button for passes and the Change Logs button for logs. However it is strongly recommended that the default names are used, see notes below.
Clicking the Change Names button opens the Edit Pass Names dialog shown below:
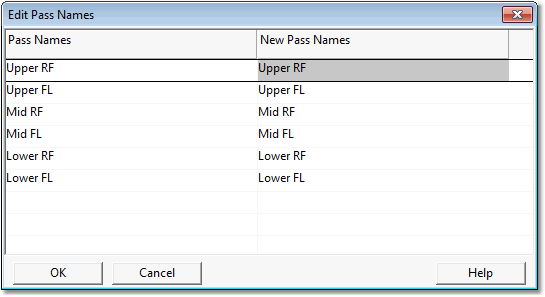
Edit Pass Names Dialog.
The Edit Pass Names dialog contains a list of all the default Pass Names down the left-hand side, to the right of this is a list of editable fields into which alternative names can be placed. The passes are unnamed by default and unless you want to change the pass names there is no need to access the Edit Pass Names dialog.
Clicking the Change Logs button opens the Change Logs dialog shown below:
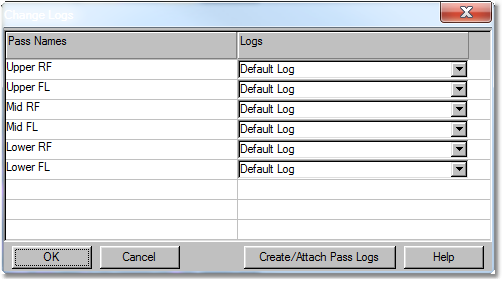
Change Log Names Dialog-Initial State.
The figure above shows the state of the Change Logs dialog when it is first accessed. Down the left-hand side of the dialog is a list of all of the passes associated with the excavation template. To the right of each pass name field is an associated material log pulldown list. Each of these lists accesses every material log which currently exists. Material which is excavated in a particular pass will report to the nominated material log. It is possible to manually create logs and use the pulldown list to associate them with various passes. However this would require substantial work which would have to be replicated with every excavation template created. In addition to requiring considerable work this manual approach to naming logs would introduce a high probability of miss-allocating logs to passes.
3d-DigPlus has an automated system for generating logs and associating them with the correct pass. The change logs dialog box contains a button named Create/Attach Pass Logs. When the Create/Attach Pass Logs button is clicked in the above example the result is shown in the figure below:
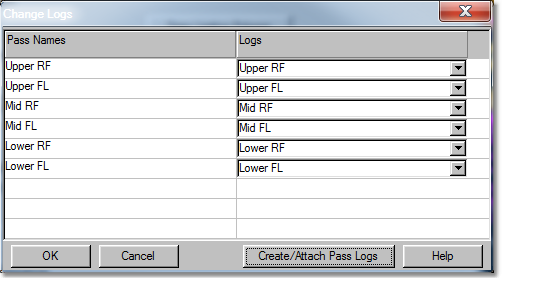
Change Logs Dialog-State After Log Attachment.
As can be seen above, 3d-DigPlus has created a new and unique material log for every pass, the newly created logs bear the name of the pass with which they are associated.
Before creating a new material log for a particular pass 3d-DigPlus checks the names of all existing material logs to see if a log exists bearing the name of the pass. If a log already exists with the same name as the pass this means the process of creating material logs for similar passes has already been conducted for an existing excavation template. In such cases 3d-DigPlus does not create a second log with this name but instead attaches the existing log to the pass for the current excavation template.
In practice this typically means that the process of creating the new logs takes place only when the very first excavation template is set up. Thereafter 3d-DigPlus finds the appropriate existing log and associates it. The exception to this is where a new pass is introduced for the first time in a particular excavation template. In this case 3d-DigPlus will attach passes to existing logs for passes were suitably names logs are available, and create new logs as necessary for passes associated with seams not yet excavated.
When setting up a new Staged Excavation the following points should be kept in mind:
Pass Names are automatically generated based on the name of the Lower Surface of the pass. There is no need to access the Change Names dialog in order to use the default Pass Names. The Change Names dialog is only used if a Pass needs to be manually name.
Unique Material Logs for each Pass are automatically generated and/or attached, however the Change Logs dialog must be accessed and the Create/Attach Pass Logs button used to prompt this process. This process is only required once when the Staged Excavation is initially set up. Any changes to a Staged Excavation which do not change the selected Pass Surfaces do not require any changes to the Log set up.
Important Information
 It is strongly recommended that the the default names created by 3d-DigPlus for Passes are used, and that the Create/Attach Pass Log button is used to automatically generate material logs with the same names. These auto generated names bear the name of the lower seam in a given pass. These names may not be ideal, but they are quite legible and using this system guarantees the appropriate log is associated with a given pass. You do have the choice of manually renaming passes. If this is done the material logs subsequently auto generated will bear the same name. However the manual naming is a time-consuming process. Passes must be manually named as each new excavation template is created, and the names given when setting up the new template must be identical to the names previously used. In the course of a large job using this procedure carries a very high probability of error.
When the Multiple Lifts option is selected a system of lifts can be designed which are consistent with the proposed mining method and excavator capacity. The use of Lifts is not mandatory, and for many types of studies, such as long term dump studies, Lifts may not required,or a limited number of deep lifts may suffice. However for detailed productivity studies Lifts must be set up with geometry which matches the mining practice.
Lifts are set up using the the parameters in the Lift Parameters group on the Excavate Pass Parameters dialog (see figure above).
The spacing of Lifts is controlled by the Bench Height for Lifts parameter. This is the vertical distance between Lift Benches. This is augmented by the Minimum Bench Height Parameter. If the topography or coal surface is undulating there is the possibility of the system creating either very thin lifts or lifts with very small planar extents. Using the Minimum Bench Height Parameter avoids this by incorporating such lifts into an adjacent lift.
Several parameters and settings are used to control the topology of the floor of lifts. The options are Use Horizontal Benches and Benches Offset from a Surface. These options are illustrated in the following figures which show longitudinal sections:
Horizontal Benches. When the Use Horizontal Benches option is selected lifts are created as horizontal benches. The vertical spacing between benches is controlled by the Bench Height for Lifts parameter. There are two options for determining the levels of each benches:
Free Bench Levels. With this option 3d-DigPlus establishes the location of the first bench above the floor of the pass, and benches above this are offset using the Bench Height for Lifts parameter.
Fixed Bench Levels. With this option the Set Level parameter is used to set a base level from which all lifts are offset. Typically this base level will be the level of the first lift above floor of excavation, however it can be any level and the actual benches will be determined using this level and the bench Height for Lifts parameter.
The figure below illustrates the Horizontal Bench option:
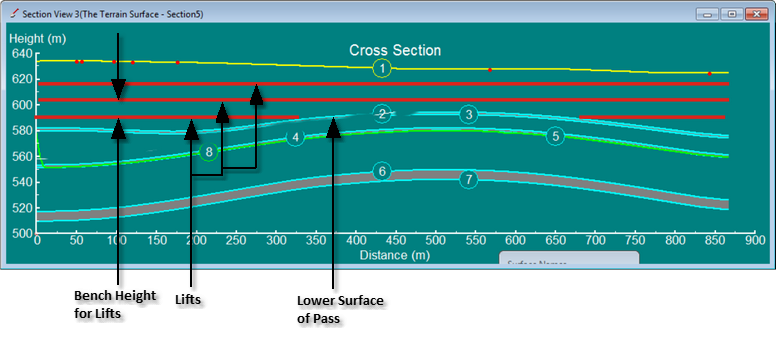
Horizontal Lifts Option.
Offset Benches from a Surface. The Offset Benches from a Surface option creates lift benches which are offset from a nominated Surface. There are two options for the offset surface:
Lower surface of Pass. This is the most commonly used option with the benches offset from the lower surface of the Pass.
Master Bench Surface. This option allows a particular surface to be nominated as the Master Bench Surface, all Lift Benches will be offset from this Surface.
The figures below illustrate these options:
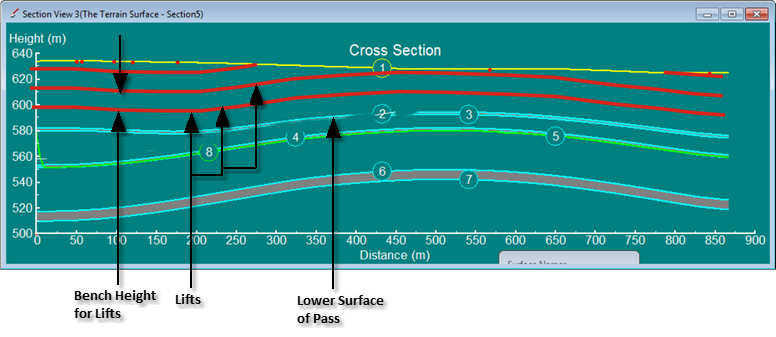
Lifts Offset from a Surface - Lower Surface of Pass Option.
the
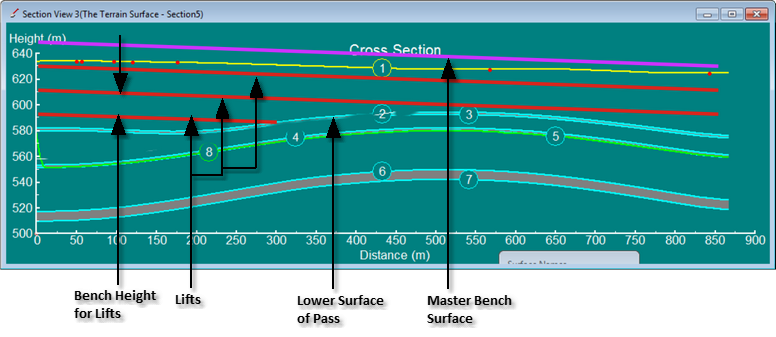
Lifts Offset from a Surface - Master Bench Surface Option.
Tip - Pits with Steeply Dipping Coal

The above examples apply to a pit with low to moderate dipping coal and moderate undulation along strike. In such cases a coal seam is typically fully uncovered prior to coal removal. All lifts associated with the waste pass above coal are typically excavated prior to coal removal. In pits with steeply dipping seems or complex geology along strike it may be necessary to uncover some of the coal at a particular lift, prior to full exposure of coal. 3d-Digs automated excavation functionality can handle this situation, it is handled by Subsequences and covered in the following sections.